Pages

Showing posts with label Fish Keeping and Aquariums. Show all posts

Saturday, July 13, 2019

How to Keep Your Aquarium Sand Clean

Want to use sand substrate in your aquarium, but you’re afraid it’ll be hard to clean? Not a problem! Keep reading as I share my easy tips and tricks for keeping your sand clean and animals healthy.


Recently, I released a post explaining the first steps for setting up a planted tank with sand substrate. Several people asked, “How in the world do you keep that sand clean? Won’t it just get sucked up by the siphon if you try to vacuum it?” Great question! I had the same worries when I first switched from gravel to sand because no one wants to use a substrate that’s hard to clean and could trap excess waste that might harm your fish. But after I teach you a few simple techniques, you’ll realize that there’s nothing to it and it’s just like cleaning gravel… almost. ๐Ÿ˜‰ (By the way, I’m going to be talking about using a siphon to vacuum your aquarium substrate, so if you don’t know what that is or how to use one, definitely check out my water changing article.)

Select the Right Sand

Okay, first off, let’s talk about sand selection. Not all sands are created equally, and if you’re using a very fine, lightweight sand, it’s going to get sucked up more easily in your siphon and you may have to add some more sand occasionally. In fact, word to the wise, you’ll also want to prevent sand from getting sucked up by your hang-on-back or canister filter and ruining the motor – which is exactly what happened to my first AquaClear filter. To prevent that from happening, buy a prefilter sponge (which looks like a cylinder with a hole on one side), and stick it on end of your filter’s intake tube. The added bonus it that it’ll grow beneficial bacteria and prevent any fish or plant leaves from getting sucked up too!

I’ve never had any trouble with aggressively vacuuming my substrate because I use the heavier generic-brand sand sold by Petco and PetSmart. Side note, but I prefer black sand versus a lighter color because fish waste doesn’t seem to show up as much. Some people might say, “Well, why don’t you get a brown colored, natural-looking sand to really hide that mulm?” Personally, I think the fish and plants just seem to really pop against a black background and substrate, so that’s why I prefer it.

Black sand from Petco and PetSmart
Large-grained black sand from Petco

As I was saying before, the Petco sand has large particles that rarely get sucked up because they’re too heavy to make it all the way up the tube. The only time I’ve had problems with this is if I’m using my mini siphon, which is about six inches tall. It seems that the tube portion is just short enough to suck up the sand if I’m not paying attention.

How to Vacuum Sand Substrate

So, how do you deal with sand that keeps getting sucked up in the siphon? Okay, there are three common methods.

Method 1: Hoover above the sand
If your sand is super fine, don’t stick your siphon tube into it. Instead, use the tube to gently swirl water above the sand and then suck up any detritus that floats up into the water column. The great thing about this method is that you’re not really disturbing your aquascape. The sand is still nice and smooth and undisturbed. However, I believe Rachel O’Leary likes to use a chopstick to stir up the substrate a bit and then hover above with her siphon to suck up whatever gets loosened.

Method 2: Vacuum the sand like gravel
If you’ve got a heavier sand like me and really want to get a deeper cleaning, gravel vacuuming is the way to go. What do I mean by that? Just stick the tube down into the sand like an inch or so, suck up some waste, and then when you lift up the tube, the heavier sand particles will fall while the lighter brown detritus continues to rise. Easy peasy! Just like vacuuming regular gravel. I like to systematically clean the tank bottom in a grid-like pattern: vacuum, raise and release, vacuum, raise and release – rinse and repeat until I’ve cleaned about half the tank. And then next week, I’ll clean the other half or wherever looks dirtiest.

using siphon on black sand in red cherry shrimp tank

Method 3: Crimp the siphon hose
The final method is really useful for my shrimp tank. Honestly, this should be my easiest aquarium to clean because I don’t have to wipe off any algae since it provides extra grazing areas for my shrimp. (Pro tip: use razor blades for algae scrapping to avoid scratching the walls up with sand grains.) Unfortunately, I have a really hard time not sucking up the millions of tiny, clear shrimp babies crawling everywhere. It’s incredibly stressful! So, this principle works for both sand particles and any live animals you don’t want to suck up. Just vacuum like normal, but if I see any baby shrimp in the tube, I clamp down on the hose to stop the flow and wait for the shrimplet to eventually crawl its way out. This works for sand as well. Vacuum, crimp the hose, vacuum some more, and then crimp it to stop. It’s like magic!

More Maintenance Tips for Sand

As awesome as these techniques are, they’re not perfect and some grains may accidentally get sucked up anyway. Because of that, my husband Mr. Gamer really doesn’t want me pouring the wastewater down our sink or toilet and accidentally clogging up our plumbing. Instead I just dump it onto our lawn or use it to water our plants. Win-win situation!

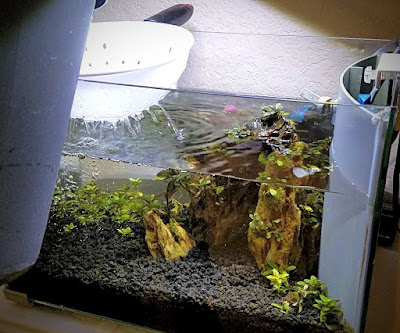
As you refill your aquarium, just realize that sand can be easily disturbed if you aim the hose right at it, so lots of people use plastic bags or colanders to lessen the water pressure and prevent their aquascape from moving around. However, my aquariums are tall enough where I can just aim the spout at a tank wall or maybe some dรฉcor to help dissipate the flow.

plastic bag used to protect sand substrate during water changes

In fact, in my 20-gallon tank, I’m trying to maintain a gentle slope in the substrate where the sand is lower in the front and higher in the back, kinda like stadium seating for the plants. However, gravity and my nosy kuhli loaches tend to flatten the sand over time, so I usually take the opportunity during water changes to manually rebuild my little hill as needed. Boom! Clean tank, clean sand… looks great for about 20 seconds until my fish mess it up again. ๐Ÿ˜œ

Does Sand Substrate Cause Toxic Hydrogen Sulfide Gas?

I know there's been some discussion about deep sand beds potentially creating an environment for anaerobic bacteria to grow and producing pockets of deadly hydrogen sulfide gas. I’m not really worried about it with my Shy Guys jungle tank because a) my substrate isn’t that deep (like 3 inches at most) and b) I regularly stab root tabs into my substrate, which messes up sand a bit. Plus, Jason from Prime Time Aquatics, who happens to be a college professor of microbiology, says he’s actually seen hydrogen sulfide bubbles coming from some of his tanks but he’s also running a lot of sponge filters so it’s never really bothered any of his fish.

If you want to learn about my whole process for setting up a planted tank with sand substrate, check out the series here. Take time to enjoy your aquariums and I’ll see you in the next post!


Subscribe to my YouTube Channel for practical fish care tips for busy aquarists and follow me on Instagram for more updates! ๐ŸŽฎ❤️๐ŸŸ

Saturday, June 29, 2019

How to Set Up a Planted Tank with Sand Substrate - Part 1

Is it possible to grow aquarium plants in sand substrate? Some say yes, same say no… keep reading to find out how I set up a 20-gallon jungle style tank using two kinds of sand!


Topics include:
▶ Preparing the aquarium
▶ Experiment to test sand substrate with plants
▶ Setting up the equipment
▶ My plan for cycling with live plants

In the next video about this tank, I’ll cover how I selected, purchased, and added live aquarium plants to create a jungle paradise for my shy fish.

Resources:
Sand for a Planted Aquarium?
Sand Showdown: Pool Filter Sand vs Nat Geo Aquarium Sand
5 Things I Wish I Knew Before Growing Rooted Aquarium Plants

Saturday, June 1, 2019

4 Easy Setups for a 20-Gallon Aquarium

You know the saying, “bigger is better”? Well, some of us don’t have the space to keep a huge aquarium or tons of tanks. Keep reading for some creative aquarium setup ideas if you’re constrained to a maximum of 20 gallons like me.


I currently own 3 “nano tanks” – the biggest of which only holds 20 gallons. In my family, my husband Mr. Gamer is a collector of All. Sorts. Of. Things. And I’m more of a minimalist, so I don’t really have the space or even desire to get a larger aquarium right now. However, that means I’ve had to get pretty creative when it comes to optimizing the enjoyment I get from my 20-gallon tank. Like many of you, I get bored with my setups. I want to try new fish, new plants, new equipment… but I’m limited to the same size glass box. So here are four different ideas of what I’ve kept in a 20-gallon tank over the years – the good, the bad, and the ugly!

Tank Setup #1: Community Tank for Beginners

My first setup was a basic community tank inspired by the beautiful aquascapes I saw on Pinterest. It used natural-looking fake plants from PetSmart and black gravel, which was eventually replaced with black sand. For stocking, we've got albino cory catfish as bottom dwellers, neon tetras in the middle, and then marbled hatchetfish up top. The hatchetfish promptly died of ich, which is when I learned the importance of quarantine.

So I replaced them with another top level swimmer, furcatus or forktail rainbowfish. Very lively and entertaining, but I didn’t realize that smaller Pseudomugil rainbowfish tend to have shorter lifespans. The centerpiece fish was a German blue ram, which eventually died because they like hotter temperatures above 80°F. Other centerpiece fish I kept at various times included a honey gourami and a male betta fish, who did surprisingly well in a community tank and actually stopped biting his tail once he had other tankmates to distract him.

20-gallon beginner fish tank with natural looking fake plants

This tank crashed because of improper quarantine that introduced a fast-killing disease called columnaris. Awesome. I’ll make an article on treating columnaris in the future, but by the time I figured out what it was, almost everything had died.

Tank Setup #2: Axolotl Aquarium

I seriously wanted to rage quit the hobby at this point. All that time and money poured into this aquarium obsession, and I was left emotionally drained. This is when I left the fish world and took my detour into keeping axolotls. Still kept the same fake plant decor, but had a totally new set of challenges with keeping the water cold and clean enough. After my experiences, I would recommend only keeping one adult axolotl in a 20-gallon tank because of their heavy bioload, and even then, a 20 gallon long aquarium is preferred. But, if you’re looking for an unusual underwater alternative to fish, give axolotls a try because they’re super cool and very derpy.

20-gallon axolotl aquarium

Tank Setup #3: Planted Tank for Beginners

After my axolotls passed away, I took another long break before starting tank setup #3 – the beginner planted aquarium! The decorations consisted of seiryu stone and spiderwood as the hardscape, as well as easy live aquarium plants like anubias and java fern. No more collectoritis for me – this tank focused on three fish species: a school of albino cory catfish, a school of green neon tetras, and a honey gourami as the centerpiece (plus some amano shrimp as the algae clean-up crew). If you’re looking for fun breeding projects that aren’t livebearers, the cory catfish and honey gouramis were both fairly easy to breed, and I quickly grew the number of fish I owned.

20-gallon beginner planted aquarium

After a year with this setup, I was ready to try something new! Got my first-time experience selling fish and plants at my local club auction, which was really exciting and I was happy to see them go to other hobbyists who will take care of them.

Tank Setup #4: "Shy Guys" Jungle Tank

Today I’m currently on setup #4 with this 20-gallon aquarium – the Shy Guys jungle tank. I’ll go into more detail in future posts on my plant selection and stocking choices, but given my struggles with algae in a tank full of slow-growing plants like anubias, I wanted to try creating a more heavily planted jungle-style aquarium using some faster-growing, beginner plants. I also deliberately chose fish and invertebrates that are all considered super shy (hence the “Shy Guys” theme) because there are certain species I’ve always wanted to try but I heard they hide all the time. So what would happen if I got a whole aquarium of timid creatures? Hmm…

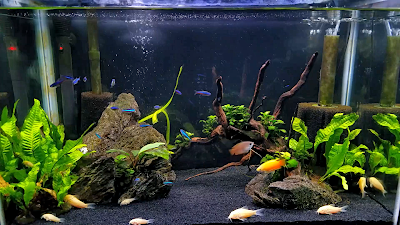
20-gallon jungle style planted tank

In the future, I have many more plans for this tank. I’d like to do more breeding projects, or perhaps keep some coldwater fish, or maybe once this tank is really established and good at growing plants – try to do a planted axolotl tank? I’m kind of torn since axolotls can live a really long time, so I don’t want to get one until I’ve kept some of my bucket list nano fish… or until I’m able to get another tank. ๐Ÿ˜‰

Question of the Day

Let me know in the comments below what aquarium themes or stocking ideas you would recommend trying in a 20-gallon tank. As always, take time to enjoy your aquariums and I’ll see you in the next post!


Subscribe to my YouTube Channel for practical fish care tips for busy aquarists and follow me on Instagram for more updates! ๐ŸŽฎ❤️๐ŸŸ

Saturday, May 18, 2019

The Top Fish to Avoid in a Planted Aquarium

Don’t you hate it when you’ve got beautifully planted tank and your brand-new fish demolishes everything? Keep watching to find out who made it on my list of notorious plant destroyers that you should avoid.


I’ve spent the better part of this year researching the perfect plants, hunting them down, and then carefully nurturing them in a 20-gallon aquarium. After months of growing without interference, it’s now time to add fish. But the last thing I want to do is accidentally add some creature that would turn this lush jungle into a deserted wasteland. I know saltwater fish are usually labeled as “reef safe” or not. So why don’t they do that with freshwater fish and plants? I did a little digging on the Internet and came up with three categories of fish: those that are definitely dangerous to plants, those that might be a little risky, and those that I heard a rumor from a friend of a friend about. So, don’t forget to comment below with any fish or invertebrates you’d add to the list.

The Chronic Offenders

  • Silver dollar fish
  • Monos and scats (brackish water)
  • Buenos Aires tetras
  • Goldfish and koi
  • Many types of African or larger cichlids (e.g., mbunas, uaru cichlids, flowerhorns, oscars)
  • Monster fish in general (e.g. stingrays, large catfish and plecos, pacus)
  • Larger crayfish
Buenos Aires tetras
Buenos Aires tetras (source)

There are many articles that suggest "goldfish-safe" or "cichlid-safe" plants, such as:
  • Anubias, java fern and java moss that can be attached to rocks to avoid uprooting
  • Fast growing vallisneria or hornwort
  • Large potted plants like an Amazon sword
  • Certain floating plants or plants that grow above water like pothos
Planted tank with albino cory catfish, java fern, and anubias
Java fern and anubias attached to hardscape

The Casual Snackers

  • Mollies
  • Florida flagfish
  • Larger gouramis
  • Bristlenose plecos (specifically likes Amazon swords)
Orange balloon molly fish
Balloon molly fish

The Rumored Bad Boys

  • A bala shark tore up carpeting plants
  • Siamese algae eaters mowed down newly planted vallisneria
  • Larger snails such as black devil snails (Faunus ater), Columbian ramshorn snails (Marisa cornuarietis), Sulawesi rabbit snail (Tylomelania gemmifera), and some of the largest species of apple snails (Pomacea canaliculata)
Orange rabbit snail
Sulawesi rabbit snail (source)

Thankfully, none of the fish I got for this community tank are on this list so I think I’m safe for now. Honestly, the greatest danger to my plants is my own black thumb, so ya’ll can be praying for me. ๐Ÿ˜‰

Question of the Day

What fish or inverts would you add to this list? Comment below to share your experiences because I’d love to hear them. Take time to enjoy your aquariums and I’ll see you next time!


Subscribe to my YouTube Channel for practical fish care tips for busy aquarists and follow me on Instagram for more updates! ๐ŸŽฎ❤️๐ŸŸ

Saturday, May 11, 2019

How to Protect Your Fish from Heater Failure

Have you heard horror stories of aquarium heaters malfunctioning and frying an entire tank of fish? It’s happened to me before, so today I’m going to talk about heater controllers and whether or not they’re worth using.


Back when I was a beginner, I made the poor decision to buy a batch of used aquarium heaters. Gonna cut to the chase and recommend you never do that. Sure they’re only $5 a piece, but you don’t know how old they are, if the previous owner properly waited 30 minutes before turning it on, if they turned it off during water changes, etc. I had set up a quarantine tank with one of these used heaters and a few days later my husband Mr. Gamer noticed condensation and rust forming inside the glass heater tube. Oh no! Never again...

I currently use Aqueon Pro and Fluval LCD heaters, and they’ve been working well for me so far. However, I found out that many aquarium heaters, no matter how good, tend to eventually die. Now there’s several ways it can fail:
  • It can just stop working and the water gets colder and colder, freezing your fish. 
  • It can stick on and get hotter and hotter until your fish cook to death. 
  • The heater itself can crack and leak toxic compounds into the tank, which is what happened to the King of DIY’s poor freshwater stingrays.
Some people solve this problem by entirely removing all heaters from their aquariums and just heating their entire fish room. That’s not going to work for our family because my tanks are scattered throughout our home and my husband likes to keep the house cold. So, I need to use heaters, but I’d like to minimize the effects of failure if at all possible.

What is a Temperature Controller?

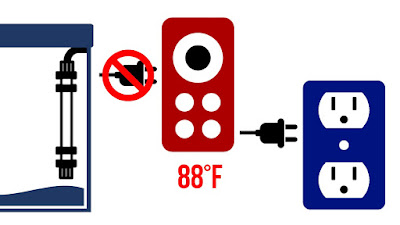
A temperature controller is an extra layer of protection to help maintain proper temperature in your aquarium. How it works is you plug your heater into the controller, plug the controller into the wall outlet, and set the temperature you want the controller to maintain. If your water ever gets too hot, the controller kills the power to the heater, thus preventing it from overheating.

how an aquarium heater controller works
A temperature controller kills the power to the aquarium heater if the water gets too hot.

Yes, if you have an adjustable heater, it’ll have its own internal thermostat to maintain the temperature, but the controller’s thermostat and sensor are supposedly more accurate and having a second thermostat provides an extra safety net. When I looked on Amazon and fish forums, InkBird seemed to be the most popular brand. After reading some reviews, I got the basic ITC-308 model, which comes with one outlet for a heater and one outlet for cooling with a fan or chiller. InkBird also sent me a free ITC-306T (their new dual timer controller) to review, so I’m going to cover the features/differences between the two timers, how to set them up, and then give an honest assessment of what I really think of these InkBird controllers and whether or not they’re necessary.

Features of ITC-308 vs. ITC-306T

Okay, let’s start with the ITC-308 I bought for myself last year. It comes with this display unit, a temperature probe, the two outlets for heating and cooling, and a plug. My favorite feature is that it has alarms for when the temperature is too high or low.

features of the InkBird ITC-308 temperature controller

The new ITC-306T is different because it has two outlets for heating and you can set the heater to hit two different temperatures throughout the day – like a daytime and nighttime mode. Unfortunately, it doesn’t have a temperature alarm you can set, which I was surprised to find out.

features of InkBird ITC-306T temperature controller

If you'd like to see how to set them up, view the video above for step-by-step instructions.

Review of InkBird Temperature Controllers

Well, I just got the ITC-306T for review, but I personally wouldn’t get it because I have no need for temperature changes throughout the day. I’m guessing certain reptiles or other pets like distinct daytime and nighttime temperatures. Or maybe if you wanted to make the fish or shrimp you breed hardier and more adaptable to a wide range of temperatures, you could use this. However, the lack of adjustable temperature alarms was a no-go for me.

As for the original ITC-308 I bought, I’m going to be honest and let you know that about 6 months after I set it up, the temperature reading started climbing and climbing to over 100°F, even though my digital thermometer said the water was still at 78°F. I went to InkBird’s website, found out they have a 1-year warranty, and emailed them. The customer rep immediately responded and helped me troubleshoot the issue, told me I had a faulty temperature probe, and sent me a brand-new unit via Amazon.com that arrived two days later. Didn’t have to return the old controller or wait two months for the new one to ship from China or anything.

Final Thoughts: Should You Get a Heater Controller?

I still think it’s worth it to get a temperature controller for any display aquariums or special fish you really care about, just as extra protection against overheating. But for all my other tanks, I’ve started using an industrial digital thermometer by General Tools because it’s very reliable compared to the cheap Zoo Med ones and it has high and low alarm settings that you can program. It won't save your tank from overheating if you're not home, but it’s definitely saved my fish a few times when I forgot to turn on the heater after a water change.

General Tools digital thermometer for fish tanks

If you like the idea of a heater controller and aren’t afraid of DIY projects, the King of DIY has a popular tutorial on how to make your own. Also, huge thanks to Hannah Horinek for being the latest supporter on my Patreon! Take time to enjoy your aquariums and I’ll see you in the next video.


Subscribe to my YouTube Channel for practical fish care tips for busy aquarists and follow me on Instagram for more updates! ๐ŸŽฎ❤️๐ŸŸ

Saturday, May 4, 2019

How to Boost Your Betta Fish Tank Filter the EASY Way


Remember that DIY betta tank filter hack I posted last year? Turns out my DIY tricks didn’t work so well in the long run, so here’s the part 2 sequel of lessons I learned and what I would recommend doing instead.

Materials I Used

Top Fin® 5 gallon glass aquarium
Filter sponge media
Bio-rings
Internal filter
Never clog air stone
Mini sponge filter
Aquatop air pump
USB nano air pump
USB backup battery

Resources

How to Reduce Aquarium Filter Flow for Betta Fish
You don't need an Aquarium Filter. You need...
A Great Tank from Amazon?! The MarineLand 5 Gallon Portrait Tank
How to Clean a Betta Fish Tank… the Easy Way!

Question of the Day

Are you a fan of aquarium starter kits or not? Comment below to share your experiences because I’d love to hear them. Take time to enjoy your aquariums and I’ll see you next time!


Subscribe to my YouTube Channel for practical fish care tips for busy aquarists and follow me on Instagram for more updates! ๐ŸŽฎ❤️๐ŸŸ

Saturday, April 27, 2019

8 Mistakes to Avoid When Breeding Cherry Shrimp

Cherry shrimp are supposedly really easy to breed, but you’re not seeing any babies. Keep reading as I run down my complete checklist for figuring out why!


If you've been following me on social media, you can tell that I've been bitten by the shrimp breeding bug. Several months ago, I got some high-quality red cherry shrimp from a local breeder, set them up in a 10-gallon tank with everything they could possibly want, and then waited… Hmm, why am I not seeing any babies? Everyone says they’re supposed to breed like freshwater cockroaches. Are my dreams of selling hundreds of shrimp for profit completely doomed?? Luckily, there are lots of helpful veterans in the freshwater shrimp community, and after researching their advice, here’s the troubleshooting checklist I came up with:

#1 Water Quality

I know this seems very obvious, but before we go down the rabbit trail of random reasons why your shrimp may not be breeding, let’s make sure we have all the basics covered. Obviously, we don’t want any toxins in the water, such as ammonia, nitrites, and excess nitrates. Maybe you’re thinking, “I’m fine because they’ve been in well-established, cycled tank for ages.” Well, don’t forget that a population explosion could cause your nitrates to creep up, so remember to bring out that water test kit every once in a while. Also, make sure you don’t have any other toxins coming from outside the tank, such as cigarette smoke, harsh cleaning products being used nearby, or not washing your hands thoroughly before putting them in the tank.

As for water parameters, PH is not as important for neocardinas compared to other shrimp species, since they can withstand wide range of 6.0-8.0. Same thing with KH (or carbonate hardness), which can span from 0-8°. However, you should have at least moderately soft to moderately hard water at about 4-14° GH (or general hardness). Also, make sure there’s enough oxygen in the tank. A lot of people like to put shrimp in planted tanks with CO2 injection, so gas levels may be something to watch out for. Certainly, adding a sponge filter or bubbler of some sort will help introduce more oxygen into the water.

Feeding time for red cherry shrimp swarm

#2 Temperature

I wanted to put temperature in its own category because even though cherry shrimp easily live at a wide range of temperatures, they’ll breed more readily at warmer temperatures higher than 72°F (or 22°C). Of course you don’t want to go too far with temperatures hotter than 80°F (or 27°C) because it will shorten the shrimp’s life span and potentially affect the survival rate of eggs and baby shrimp.

#3 Stable Environment

When I first got my shrimp, I kept checking every day for berried females, not realizing that newly acquired shrimp have an adjustment period of approximately one to two months where they’re still getting used to their new environment. Once they get comfortable and start breeding, don’t forget it takes another month on top of that for those eggs to hatch.

With that in mind, don’t be constantly (or rapidly) changing their environments. In fact, that’s why many veterans recommend not doing frequent water changes or, at the very least, only doing small water changes when you do.

Last comment on their environment is tank size. Obviously, if the aquarium is too small, you may run into overcrowding issues quickly where there's not enough food for everyone or the water quality starts suffering. And some people say that if the tank is too big, then the males can’t locate females in time when the ladies are ready to mate.

10-gallon aquarium for breeding red cherry shrimp

#4 Culling

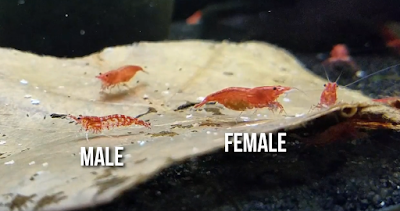
Speaking of males and females, a lot of shrimp keeping veterans recommend a ratio of 1 male to 2 females, or maybe 1 male to 3 females at most because if you don’t have enough males, then they may not be able to catch the female right after she molts. So, point #4 is don’t cull any shrimp while your colony is small. This is actually a mistake I made because I wanted to keep my shrimp as red as possible and unfortunately males don't look very colorful. So if you cull too aggressively too soon, you might accidentally rid yourself of all viable males!

difference between male and female red cherry shrimp

#5 Age of Shrimp

Not only do you need to patiently wait while your new shrimp are getting used to their tank, but also because your shrimp might be too young to breed. Sellers often send juveniles that are only 1/2 to 3/4 inches long, and most shrimp reach sexual maturity when they’re closer to an inch (2.1-2.5 cm) long, depending on the gender. So, wait till they get a little bigger before expecting any monkey business.

#6 Food and Nutrition

This is a very important criteria, and I fully admit that I've made several of these mistakes. If your shrimp aren’t breeding:
  1. Are you feeding them enough protein? Just like how chicken eggs are full of protein, shrimp also need protein to make their eggs. Consider giving them protein foods (like frozen bloodworms) one to two times a week.
  2. Are you feeding them enough, period? Everyone always warns beginner breeders not to overfeed their shrimp tank for fear of having water quality problems, but underfeeding will also cause major problems. Shrimp are tiny little grazers that need constant access to food.
  3. Are they getting enough minerals? I’m going to make a post about the shrimp reproductive process, but females must molt first before they can mate. So, if they don’t have enough calcium and other essential nutrients to successfully molt, you’re not going to get any babies. Personally, my tap water is on the soft side, so I currently use cuttlebone and Shrimp King Mineral food to ensure proper molting.
Red cherry shrimp fighting over Hikari Crab Cuisine pellet

#7 Predation

There’s a reason why all the experts suggest that you keep a species-only tank for breeding shrimp because almost all fish will prey on shrimp, babies and/or adults. If you’re bent on keeping shrimp with fish, make sure you provide lots of cover with hides or heavy foliage and just be okay with the fact that some babies will get eaten. Also, don’t forget that predation also comes in small packages, such as planaria, hydra, and dragonfly nymphs. Fenbendazole dog dewormer is a popular treatment for planaria and hydra. However, dragonflies are super tough and may require you to restart your tank, since most things that kill them will also kill shrimp.

Dragonfly nymph by Dave Huth from Wikipedia
Dragonfly nymph (source: Wikipedia)

#8 No Babies After Seeing Eggs

Finally, let’s consider the case where maybe your shrimp are successfully mating and carrying fertilized eggs, but you’re not seeing any evidence of babies. First off, baby shrimp are super small and they don’t move a lot for the first few days after birth. So if you had a berried female and suddenly the eggs are gone, it could be that they actually hatched but you’re just not seeing them yet.

Another problem may be not having enough biofilm or other baby foods available for the shrimplets. I’ll do a whole post on this later, but I recommend adding Indian almond leaves and cholla wood to grow biofilm, letting lots of algae cover your back and side tank walls, and getting a powdered shrimp food like Bacter AE that will float around the tank so they don’t have to fight the adults to feed.

Also, while you’re doing water changes, make you’re not accidentally sucking them up. I usually move pretty slowly while gravel vacuuming, but just in case, I siphon out the dirty water into a white bucket, use a flashlight to find any escapees, and then return them using a turkey baster.

Red cherry shrimp swarming around food

After a few months of improving my shrimp’s environment and diet, my dreams are finally coming true! I’ve grown from 15 shrimp to a colony of 100 to 200, with more and more babies are popping up every day. Maybe I should start working on my next dream of breeding crystal red shrimp…

Question of the Day

Do you have any tips for breeding cherry shrimp? Comment below to share your experiences because I’d love to hear them. Take time to enjoy your aquariums and I’ll see you next time!


Subscribe to my YouTube Channel for practical fish care tips for busy aquarists and follow me on Instagram for more updates! ๐ŸŽฎ❤️๐ŸŸ

Saturday, April 20, 2019

How to Save Your Fish from Chlorine Poisoning


Are your fish suddenly dropping like flies, even though your water test kit says everything’s fine? Might be chlorine poisoning from your tap water, so keep watching to learn the symptoms and how to treat it. Topics include:

▶ What are 4 common causes of chlorine poisoning?
▶ What do the symptoms of chlorine poisoning look like?
▶ How do you treat a fish that has been exposed to chlorine?
▶ How do you prevent chlorine poisoning from happening again?

Materials I Use

Seachem Prime dechlorinator
Fritz Complete water conditioner (with pump head)
Sodium thiosulfate dechlorinator
Tetra 6-in-1 test strips
Quarantine medication trio
Sponge filter

References

Dead Fish! Don't Make This Mistake When Cleaning Your Aquarium


Subscribe to my YouTube Channel for practical fish care tips for busy aquarists and follow me on Instagram for more updates! ๐ŸŽฎ❤️๐ŸŸ

Saturday, April 13, 2019

5 Things You Need to Know About Planted Aquarium Lighting

If you’re getting into planted tanks, learning about lighting can be overwhelming. Keep reading to find out the 5 things I wish I’d known about lighting when starting my first planted tanks.


If you want to play with live aquarium plants, lighting is one of the key building blocks that you have to learn about. The goal with lighting is to grow plants, enhance their coloration, and of course minimize algae. When your lighting is out of whack with the available nutrients, your plants can end up failing to thrive or being covered with so much algae that you can’t see them anymore. So let’s dive into my top five list for lighting:

Tip #1 : Buy a planted tank LED light

Yes, you can use the default light that came with your aquarium kit or get a really cheap light, but I find they’re usually not strong enough or don’t last very long. Some people build their own LED lights, especially if they have a giant fish room with multiple aquariums, because lighting can get really expensive. But if you only have a few tanks like me, light companies like Fluval or Finnex are pretty good at what they do. Buying quality lighting from them ensures that your plants will get the full spectrum they require.

DIY LED aquarium lighting
Homemade aquarium lighting by the King of DIY

Tip #2: Get a light that covers your entire tank

Some lights aren’t great at light dispersion or spread, which means the plants right underneath the light get lots of photons but the plants on the edges of the tank are pretty shaded. Now you can work around this by planting high light plants in the middle and low light plants on the edges. However, most people just get a better light or buy multiple lights if they have a large aquarium to cover.

Multiple lights on planted aquarium
Multiple lights used on large planted aquarium (source: American Aquarium Products)

Tip #3: Make sure your light is strong enough

Speaking of making sure all your plants get enough light, you also want to consider the brightness in your aquarium, especially if you have a deeper tank. You may hear people talk about a light’s PAR (Photosynthetically Active Radiation) rating, which refers to the light's strength. There’s a lot of debate on how much PAR is required, but the rule of thumb I’ve heard is that low light plants need 15-30 micromols of PAR, medium light plants need 35-50 micromols, and high light plants need over 50 micromols (plus CO2 injection to avoid algae). Some products will list the PAR rating, but other times I’ve had to search online for the PAR readings that other hobbyists took. If you’re lucky, your local fish club may have a PAR meter that you can rent (because they’re super expensive).

Tip #4: Use an outlet timer with your light

Why do you need a timer? Because if you forget to turn on the lights enough, your plants will get sad and lose their leaves. If you give them too much light (or leave them on 24/7), you’ll have so much algae and green water, you probably won’t be able to see into your tank anymore. How long to turn on your lights really vary from tank to tank. If you have a ton of fast-growing plants in a high tech tank, you may leave that light on up to 12 hours a day. But if you have slow growing plants in a cold water tank in a room that already gets a bunch of ambient lighting, maybe you set your timer closer to 5 hours. Some people split up their lighting so that it’s on in the morning, turns off while they're at work or school, and then is on again at night.

aquarium light on a mechanical timer

Tip #5: Lessen your lights in the beginning

If you remember my previous post, I mentioned how new plants in your aquarium need time to acclimate to their new environment. During those beginning stages, they’re not going to grow a lot, so if you provide a lot of light, the plants aren’t going to use it as much, and algae is going to take advantage of it instead. Therefore, some people recommend starting your timer for only six hours a day for the first few weeks, and then gradually increasing to eight hours or beyond afterwards.

Bentley Pascoe said that if you have a dimmable light like the Fluval Plant Spectrum LED light, he actually dims the lights for his new plants. With an 18-24” tall tank, he starts off the light at 50% strength for the first two weeks, checks for plant versus algae growth, ups it to 65-75% strength if the plants are doing well, and then keeps increasing the light strength until he hits the maximum amount he wants. For shorter tanks, he’ll start the light off at 25-35% strength and then slowly increase from there. Genius!

Question of the Day

What’s your favorite type of aquarium light and how long do you have it on for? Comment below to share your experiences because I’d love to hear them. Take time to enjoy your aquariums and I’ll see you next time!


Subscribe to my YouTube Channel for practical fish care tips for busy aquarists and follow me on Instagram for more updates! ๐ŸŽฎ❤️๐ŸŸ

Saturday, April 6, 2019

An Introvert’s Guide to the Aquashella Aquarium Festival


Everyone’s been hyping up Aquashella, a fish convention for hobbyists, so I really wanted to attend the Dallas 2019 one. But… I’m a major introvert who’s still trying to stay semi-anonymous. So what was it like? Which FishTubers showed up? Was it worth attending? Keep watching to hear my version of the story!

Question of the Day

Did you attend Aquashella or do you want to? Comment below to share your experiences, and become a Patreon supporter for more behind-the-scenes footage!


Subscribe to my YouTube Channel for practical fish care tips for busy aquarists and follow me on Instagram for more updates! ๐ŸŽฎ❤️๐ŸŸ


Saturday, March 23, 2019

What Is the Nitrogen Cycle for Freshwater Aquariums?

When I was a brand-new fish keeper, I remember asking questions like, “Can you put fish in a new tank right away?” and “What is new tank syndrome?” Keep watching as I explain the aquarium nitrogen cycle in easy, beginner-friendly terms, as well the beneficial effect that aquarium plants can have.


Materials I Mentioned

Water test kit
Ecology of the Planted Aquarium by Diana Walstad

Resources

The Nitrogen Cycle - Fully Explained!
Nitrogen Uptake by Aquatic Plants
Using plants as nature’s filtration
Fish store tour of Ocean Aquarium

Question of the Day

How did you find out about the nitrogen cycle when you first started keeping aquariums? Comment below to share your because I’d love to hear them. Also FYI, I won't have a post next week because I'll be at Aquashella. Take time to enjoy your aquariums and I’ll see you next time!


Subscribe to my YouTube Channel for practical fish care tips for busy aquarists and follow me on Instagram for more updates! ๐ŸŽฎ❤️๐ŸŸ

Saturday, March 16, 2019

How to Boost Root Growth in Aquarium Plants

So you want to try keeping stem plants, carpets, rosettes, bulbs, or other rooted plants in a planted tank, but after buying your first few, they ain’t looking too hot. Keep watching as I reveal the top 5 things I’ve learned so far about growing healthy roots for healthy plants!


When I first started dipping my toe into the aquascaping world, I went with your beginner plants – java fern, anubias, bolbitis, and so on. What do all of these have in common? They’re rhizome plants that that you can pretty much glue to a rock and treat it like a piece of aquarium decor. Very hardy, don’t need much light, hard to kill.

Eventually, I wanted to broaden my horizons and get into the world of rooted plants that actually need soil or substrate to live in. That totally opened up my options to stem plants, carpeting plants, crypts, bulbs, you name it! I mean, we’re talking level 2 stuff here, right? Hah! That also means I had to be prepared to face level 2 problems and outright failures. So, come along with me as I reveal the lessons I’ve learned so far when it comes to growing healthy roots for healthy plants!

Tip 1: Leaves may melt off after you first plant them

First off, I learned that at the plant farms, most aquarium plants are actually grown emersed (above water with only their roots and substrate covered in water) rather than submersed (grown entirely underwater). Crazy, right? The reason why they do that is because aquatic plants grow much bigger and faster when they have unlimited access to carbon dioxide from the air, and their leaves are also free of algae and snail eggs. However, when we take those emersed grown plants and plunge them into the water, those leaves go into shock and often melt off, leaving you to think that you bought a dud. Don't throw the plant away! Leave it in your tank, cut off any dying, emersed grown leaves, and eventually the new submersed grown leaves will pop out, probably looking a little smaller and shorter than before. You’re essentially paying for the healthy roots on a plant, not the leaves.

Emersed vs submersed growth in cryptocoryne parva
Emersed vs. submersed grown leaves on a crypt parva (source: spec-tanks.com)

Tip 2: Don't move your rooted plants if at all possible

Once you’ve picked a spot for your new plant, don’t move it. Unlike rhizome plants that allow you to frequently redo your aquascape just by moving the stone or driftwood they're attached to, rooted plants need time to settle in and become, well, rooted. Every time it gets uprooted – whether because you’re rescaping, you accidentally bump it when gravel vacuuming, or you have a jerk of a fish who likes to dig – you’re basically pushing the reset button for that plant and it has to get used to its surroundings all over again. It’s not going to grow well until it feels nice and stable for a while. (P.S. Plant weights can help keep your plants down until they grow more roots.)

Tip 3: Make sure the substrate is deep enough to grow roots

So, what’s the best way to make a rooted plant feel nice and comfortable? Well, I’m not going to get into a big debate about which brand of substrate is superior. Just remember: regardless of what kind you choose, make sure you use enough of it. Some of you might be tempted to buy something really high quality and expensive, which means you may not have the funds to get a lot of it. Most planted tank sources recommend a total substrate depth of 2 to 3 inches (or 5 to 8 cm). That way your plants have enough room to grow deeper roots and not get uprooted at the slightest touch.

Tip 4: Pay attention to the particle size of the substrate

Speaking of substrate selection, I know I just said that I didn’t care what kind you bought. That being said, you have to make sure the substrate particles aren’t too big or too small. If you go too big and have the equivalent of river rocks for your ground cover, the gaps between the stones are too wide and the roots won't anything to hold on to. (Again, I’m talking about rooted plants, not rhizome ones that can hold on to practically anything.)

Aquarium using river rock as substrate
River rock is too big of a substrate for most planted aquariums (source: Reddit)

If you go with a really fine sand, like Caribsea Super Naturals sand, there’s hardly any space between the particles for the roots to grow in. The sand is going to compact way too much and end up smothering the roots to death. Therefore, if you want to use sand, make sure it’s much coarser and larger in diameter, like Seachem Flourite black sand.

Tip 5: Use fertilizers to enhance root and shoot growth

Okay, so you’ve got your perfect substrate, you’ve planted your rooted plants, and you pinky swear not to move them. But they’re still not thriving and staying rooted for some reason. What else can really encourage good root growth? First off, if you're using an inert substrate that doesn't innately contain any nutrients, don't forget to add fertilizers into the substrate in the form of root tabs. Most aquarium plants consume nutrients from the ground and from the water column, but which one they use more depends on the species.

Another tip I heard was from Aquarium Co-Op, a retail and online store that sells live aquarium plants. Remember in the beginning of the article , where I talked about emersed versus submersed grown plants? Well, when Aquarium Co-Op gets their shipments from the plant farms, they actually try to start the process of converting plants to submersed grown, and their secret sauce for encouraging roots to grow faster is using a combination of their own Easy Green all-in-one fertilizer and Seachem Flourish Advance. Flourish Advance is described as a natural phytohormone supplement that “dramatically stimulates the growth of both roots and shoots in aquatic plants.” The ingredients include potassium, phosphates, calcium, and magnesium, which are some of the basic building blocks for plants.

Aquarium Co-Op warehouse holding tanks for live aquarium plants
Aquarium Co-Op starts converting plants to submersed growth before selling to customers

When I was having problems with plants staying rooted in my betta tank, I started adding this magical juice to my regular Easy Green dosing, and boom, no more floating plants! It’s too early to tell whether or not this definitively works for me, but Aquarium Co-Op is buying this stuff by the gallons so you can be sure they wouldn’t be wasting their money if it wasn’t worth it.

Question of the Day

What are some lessons learned about planted aquariums that you wish you'd known as a beginner? Comment below to share, and I may include them in the next plant tutorial article. If you missed Part 1 of this series, check out my 5 Tips for Starting Your First Planted Aquarium. Take time to enjoy your aquariums, and I'll see you next time!


Subscribe to my YouTube Channel for practical fish care tips for busy aquarists and follow me on Instagram for more updates! ๐ŸŽฎ❤️๐ŸŸ

Saturday, March 9, 2019

How to Clean Your Betta Fish Tank the Easy Way!

So you got your first betta fish, but find it a huge hassle to clean the aquarium. Keep reading as I show you the easy way of keeping the water nice and clear with minimal effort!


When I was a kid, a betta fish was one of my first aquatic pets because they’re so beautiful and interactive. Unfortunately, I found it a pain to clean his bowl because I always had to catch him, dump out all the glass marbles, scrub them in the sink, and then transfer everything back. (Kids, don't try this at home.) Eventually, I started avoiding this time-consuming chore and… eventually, my betta fish got sick and died from living in his own waste. Poor thing!

Little did I know that there existed a miracle tool that has saved me so much time and energy, so I can actually enjoy keeping fish. Let me introduce you to the aquarium siphon (also known as a gravel cleaner). This simple hose is like vacuum cleaner but without any electronics – and it’s about to become your best friend!

gravel vacuum for aquarium
The Python mini siphon is my go-to tool for cleaning betta fish tanks.

How to Do a Simple Water Change

So let me cover how to do a simple water change for your betta fish, which will only take you 5-10 minutes at most. You’ll need 3 things: a mini siphon (linked above), water dechlorinator, and a bucket with a pour spout that’s big enough to hold at least 50% of the tank water
  1. Remove the lid on the aquarium and turn off heater and filter.
  2. In order to start “vacuuming” your fish tank, put the big tube end of the siphon in the tank and make sure the small hose end goes in the bucket.

    How to Start a Siphon
    You can start water moving through the siphon simply by dipping the upright tube into the tank, raising it up out of the water, and then before the water totally drains out of the tube, quickly plunge it back into the tank.

    Once you notice water moving into the bucket, you can invert the tube and start vacuuming the bottom of the tank to remove fish poop, uneaten food, and other detritus.
  3. When you’ve finished vacuuming and have removed 25-50% of the tank water, take out the siphon and empty the bucket. (Old fish water is good fertilizer for houseplants.) Then fill the bucket with warm tap water that matches the tank temperature.
  4. Add water dechlorinator to the bucket (or directly in the tank), and refill the aquarium.
  5. Turn back on your heater and filter, replace the tank lid, and you’re done!
All the water change materials can go back in the bucket so it’s easily accessible for next time.

Using Python mini siphon to gravel vacuum a 3.5-gallon betta fish tank

How to Deep Clean the Tank

Now a water change once a week is pretty easy, but once a month, I like to do a deep cleaning on the aquarium. Here’s my detailed routine, which also includes a few extra steps you may need if you’ve upgraded your betta fish to a planted tank. You’re going to need all the materials from before, as well as a water test kit, algae scraperfertilizer, and maybe some aquascaping tools.

Materials needed for monthly deep cleaning for betta fish tank
  1. Remove the lid and use your test kit to test the water quality to make sure all’s well.
  2. Use your algae scrubber to remove algae off from the walls, plants, and dรฉcor. (I personally like to use a razor blade and toothbrush for my glass aquarium.)
  3. If you have live plants, now’s your time to trim and remove any dead leaves.
  4. Turn off the heater and filter, and begin gravel vacuuming the substrate like before.
  5. Clean your filter sponge or other media in old tank water (or you can be brave like Prime Time Aquatics and wash them in running tap water).
  6. Empty out the bucket, fill it with warm tap water, and add your dechlorinator. 
  7. Pour your water in the tank. (I like to use a clean plastic bag or colander to pour the water on, so that the water won't disturb the decor.) 
  8. Turn on the heater and filter, and add fertilizers as needed.
Filling planted tank or aquascape with a colander
Pouring water through a colander when refilling the tank will prevent your aquascape from being disturbed.

Bonus Tips

I’ve also got some extra tips for keeping your betta fish tank clean without a lot of extra effort, such as:
  • Add a gentle filter to keep the water from getting stagnant and gross.
  • Don’t overfeed your betta fish because less food = less poo.
  • Consider getting a bigger tank of 3 gallons or more because more water volume means it’ll take longer for your betta fish to dirty the water (and you can do fewer water changes overall).
To learn more practical tips about keeping betta fish, check out my other betta care articles. Take time to enjoy your aquariums and I’ll see you in the next post!

Saturday, February 23, 2019

How to Prevent the Top 5 Worst Days in Fish Keeping!


Recently, there was a video challenge that went around where FishTubers were tagged to reveal their worst days in fish keeping. Find out how I ranked the top five worst aquarium disasters on YouTube and what was the most common mistake among them!

Who Had the Worst Aquarium Disaster?

Bentley Pascoe
Heidi's Fish Tank
Mike from 915Mang
Nathan from Simply Shrimps
Zenzo from Tazawa Tanks

Question of the Day

What was your worst day in fish keeping? Comment below to share your experiences because I’d love to hear them. Take time to enjoy your aquariums and I’ll see you next time!


Subscribe to my YouTube Channel for practical fish care tips for busy aquarists and follow me on Instagram for more updates! ๐ŸŽฎ❤️๐ŸŸ

Saturday, February 16, 2019

How to Set Up an Easy Cherry Shrimp Tank for Breeding

Ready to start breeding cherry shrimp for fun or profit? Here’s a step-by-step tutorial how to set up a simple and easy shrimp tank for making tons of babies! Neocaridina davidi are a great beginner species that come in a variety of bright colors, breed readily like rabbits, and sell for high prices at local fish auctions.


In the past, I’ve kept amano shrimp and crystal red shrimp, but never have I tried to raise neocaridina shrimp for profit. What does it take to set up the ultimate baby-making aquarium that's not necessarily the prettiest aquascape, but is highly functional and easy to clean? Keep reading to find out...

What kind of aquarium do I need for breeding shrimp?

Cherry shrimp can be kept in tanks as small as 2.5 gallons, but most people recommend 10 gallons (38 liters) or more if you're focused on breeding. The larger the tank, the more stable the water quality is, and the happier the shrimp will be. I personally use an aquarium lid as well to minimize evaporation and changes in water parameters.

As for water source, red cherry shrimp are fine in a wide pH range of 6.0-8.0, so I just use tap water with some water conditioner. No need for RODI water and additives with neocaridinia shrimp.

10-gallon aquarium for breeding neocaridina davidi

What equipment does a shrimp tank need?

In terms of electronics, I would recommend getting the following:
  • Sponge filter: They're very gentle, won't suck up the babies, and provide good oxygenation (see my tutorial for more details).
  • Heater: Cherry shrimp like 70-80°F so you'll need a heater if your home gets colder than that (I keep my tank around 75°F).
  • Lighting: Any standard aquarium light on a timer for 6-10 hours should be fine for growing low light plants and cultivating algae on the tank surfaces for the shrimp to eat.

Red cherry shrimp with long poop strand, sitting on sponge filter

How should a shrimp tank be decorated?

  • Substrate: Most people recommend at least a thin coating of dark sand or substrate to color up the shrimp and grow beneficial bacteria. No need to buy a fancy "active substrate," which is used to control pH and other water parameters for other species like Caridinia shrimp.
  • Live Plants: Your shrimp will love you if you include lots of aquatic moss, floating plants, and other fluffy foliage as hiding places and grazing surfaces. They also help keep the water quality high (I aim for nitrates at 20 ppm or below).
  • Grazing Surfaces: Also, add some driftwood like cholla wood and Indian almond leaves, which break down relatively quickly and grow biofilm that the shrimp like to munch on.
  • Crushed Coral: If you have soft water like me, you may need to supplement some calcium using crushed coral or other sources. Generally, cherry shrimp like 2-8° KH and 4-8° GH.

Simple and easy aquarium setup for breeding red cherry shrimp

What tank mates are safe for shrimp?

Honestly, I would recommend keeping a species-only tank if you're truly serious about breeding your shrimp. However, some people keep snails, small rasboras, pygmy corydoras, and other nano fish as tank mates. Just make sure to provide enough cover for the shrimp babies to hide.

Clear baby red cherry shrimp on ludwigia repens

How do I clean a shrimp tank with so many baby shrimp around?

Some people recommend cleaning a shrimp tank less frequently, but I'm of the camp that prefers small, frequent water changes, approximately 10-20% per week. As for my siphon, I just use some 3/8" OD / 1/4" ID flexible tubing (slightly bigger than normal airline tubing), tied to a chopstick on one end for easy maneuverability. The other end of the tubing is clipped to a white bucket to collect the dirty water so that I can easily spot any baby shrimp that accidentally get sucked up.

If you spot any whitish exoskeleton molts on the ground, leave them in the aquarium because the shrimp will eat them for the extra calcium. Also, clean your sponge filter if you notice the flow is reduced, and use an algae scrubber to wipe off the front glass if needed.

Airline tubing for cleaning shrimp breeding tank

Question of the Day

What’s your favorite kind of shrimp? Comment below to share your thoughts, and check out my Breeding for Fun series if you want to see more posts like this. Take time to enjoy your aquariums and I’ll see you next time!


Subscribe to my YouTube Channel for practical fish care tips for busy aquarists and follow me on Instagram for more updates! ๐ŸŽฎ❤️๐ŸŸ