Pages

Showing posts with label Aquarium Plant Tutorials. Show all posts

Saturday, August 10, 2019

FROGBIT CARE GUIDE | How to Grow, Propagate & Contain It

Interested in getting floating plants for your aquarium? Try Amazon frogbit! Keep reading as I talk about why it’s so awesome, the best ways to grow it, and how to keep it from getting out of control.


I don’t know why I didn’t try floating plants before. I think I’m generally afraid of invasive things taking over my aquariums – whether they’re snails, guppies, or plants! But when I was researching plants for my Shy Guys tank, I really liked the jungle-y look of floating plants and the way it gives everything a green tint. I just haven’t much luck keeping them alive. My first floating plant was dwarf water lettuce, which I still love, but all the long roots fell off and the leaves disintegrated away. Same thing happened to my red root floaters – just massive amounts of die-off and melting. I did manage to save a few, but that’s a story for another time.

Finally, I discovered Amazon frogbit, also known as Limnobium laevigatum or smooth frogbit , and it’s awesome! It comes from tropical slow-moving waters in Central and South America, and unfortunately has become an invasive species in the United States via California. Therefore, do not flush this stuff down your toilet or put it in outside ponds where it can accidentally get caught on some bird’s foot and spread.

Frogbit is also known as South American spongeplant because it has thick, spatula-shaped leaves with spongy undersides that help with buoyancy. Supposedly snails like to eat the spongy parts, so just follow my plant dip tutorial and treat it with alum.

Pros and Cons of Frogbit

I really like this floating plant because the leaves are about 1-2 cm in diameter (at least in my tanks), so even though it can grow quickly, it’s much easier to remove than tiny little duckweed. I also love the long, fuzzy roots because they provide great hiding spots for shy fish and trap food for babies and shrimp to graze on. Finally, it’s great at removing excess nutrients from the water and totally got rid of all the stubborn algae in my betta tank.

However, I don’t like how floating plants get all of your arm and siphon when you’re trying to do water changes, so that was something I definitely had to get used to. Also, they readily multiply to the point where they cover the entire surface of your aquarium. That’s bad because a) the other plants don’t get enough light and b) your fish don’t get enough air because you need good surface agitation for oxygen to get replenished in your aquarium water. So, if you see your fish kinda acting lethargic or gasping at the surface, make sure to remove a bunch of frogbit or learn to contain it (details below).

Frogbit floating plants stuck on hand during water changes

How to Grow Frogbit

Everyone always says, “It’s so easy to grow, you don’t have to do anything!” But I’ve found that frogbit does best with the following conditions:
That’s also why frogbit is so hard to ship because the roots all snap off and the leaves melt if they get flipped over in the water. Luckily if you have at least a couple of surviving leaves with roots, you can usually grow a bunch more in no time.

How to Propagate Frogbit

As with most floating plants, frogbit is super easy to propagate. In the wild, they produce seeds from small white flowers, but in aquariums, they mostly spread via runners. Some people proactively pinch the new plantlets off, but I like to leave the baby plants or as long as possible (until they fall off on their own) because they seem to grow bigger and faster when they’re sharing nutrients with the mother plant.


How to Contain Frogbit

Okay, there are many reasons why you might want to do this, such as:
  1. You need good surface agitation so that your fish get enough oxygen, but you want to keep the frogbit away from the areas with the strongest current so they won’t die
  2. It’s really annoying to have your arm covered with floating plants every time you do a water change, especially when they fall outside the tank and make a mess of things
  3. You want to make sure the other plants down below get enough light
In fact, for the Shy Guys tank, I wanted the frogbit to provide shade for the slow-growing anubias, but not cover up my fast-growing background plants. So, I made a ring out of airline tubing using a hot glue gun, and I clipped one end of the loop to an airline holder to keep it in place. When it’s time to do a water change, I unhook the loop from the airline holder and it floats on the water surface, containing all the frogbit even as the water level falls and rises.

Using airline tubing loop to contain frogbit floating plants

Why is My Frogbit Dying?

I actually have 3 tanks that grow frogbit and interestingly enough, they do better in some environments than others.

#1 Betta Tank
This tank gets the most amount of light since the lid entirely made of glass (no hinge). The flow is relatively slow (using a USB nano air pump and sponge filter), and the frogbit is allowed to freely move (which means they take take turns getting under the strongest light). Therefore, the frogbit in here has the largest leaves out of all the tanks, reproduces the most quickly, and lowers the nitrates to only 5 ppm.

#2 Community Tank
The frogbit is contained and a bit overcrowded. Therefore, leaves don’t grow as big, but they do have the longest, lushest roots (because they’re protected from breakage and the tank is fairly deep). Also, I noticed that in one area of the tank, the frogbit always turned brown and mushy. It turns out that that section wasn’t getting enough light because the black plastic hood was blocking it, so I switched over to an all-glass top that hopefully will allow more light to spread.

#3 Shrimp Tank
The frogbit does the worst in this tank – the leaves stay tiny, turn yellow and develop holes, and then the shrimp eat them when they die. Now, there’s plenty of nutrients from the shrimp waste, but it looks like I still need to add more liquid fertilizers.

Question of the Day

What's your favorite floating plant? Comment below to let me know what you think. Take time to enjoy your aquariums and I’ll see you next time!


Subscribe to my YouTube Channel for practical fish care tips for busy aquarists and follow me on Instagram for more updates! 🎮❤️🐟

Saturday, July 27, 2019

How to Aquascape with Super Glue – 8 Tips

Looking to make a really cool aquascape? Then I hope you’re ready to get your hands sticky! Keep reading to find out 8 tips and tricks for building a planted tank with super glue.


After my last post on adding plants to the Shy Guys jungle tank, I wanted to delve a little deeper into the use of super glue in aquascaping. Cyanoacrylate, the primary ingredient in super glue, is aquarium-safe and is totally a miracle tool for attaching plants to hardscape (compared to hand-tying plants using sewing thread). Over time, I’ve picked up more and more clever ways on how to apply this stuff.

Tip 1: Use super glue gel

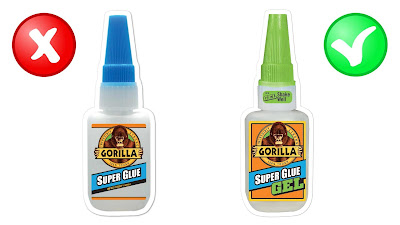
For those of you who didn’t know, super glue is commonly used to attach moss and rhizome plants (like anubias and java fern) onto hardscape such as rocks and driftwood. And you don’t want to use regular liquid super glue, but rather super glue gel. The gel type is thicker and easier to manipulate when it comes to attaching delicate plants exactly the way you want.

Liquid super glue versus super glue gel

Tip 2: Glue the roots of the plant

Now when you’re gluing down the rhizome plants, make sure not to glop it all over the rhizome. I’ve totally killed off some anubias nana petite because it was so tiny and I ended up suffocating the plant with glue. Instead, focus on gluing the roots down, and your plant will do just fine.

Tip 3: To avoid sticky hands, use nitrile gloves and the bottle cap

The problem with super glue is that it’s really easy to accidentally get it all over your hands, so wear nitrile gloves to protect your skin. Also, use the cap of the super glue bottle (rather than your fingers) to firmly press the plant down for 30 seconds. Super glue cures fairly quickly in water, but I find that I still need to hold the plant in place for that initial drying period in order to get a firm bond.

use super glue to attach aquarium plants to hardscape

Tip 4: Cover the glue with sand or soil

Word of warning: once the glue is placed in water, it will dry into a white color that a lot of people don’t like (which is another reason why you should use the glue sparingly). However, you can sprinkle and rub in some sand, soil, or other fine substrate into the glue as it’s curing, which totally hides the white color and gives it a more natural appearance.

Super glue in aquarium by StrungOut from ThePlantedTank
White super glue in a planted tank (source: StrungOut)

Tip 5: Use glue and sewing thread for more stability

As awesome as super glue is, unfortunately it’s not always sufficient for holding together top-heavy plants. In my previous video, I mentioned that I have a very large anubias in the Shy Guys tank that hides the sponge filter, and what I did was first glue its roots onto the rock, and then I used some green sewing thread to tie it down for more stability. Without the thread, I find that these taller plants can sometimes fall over and break the glue bond.

anubias rhizome tied to rock with sewing thread

Tip 6: Glue stem plants to rocks to weigh them down

Remember how in my previous post, plants kept floating away from the substrate? Instead of using plant weights, just use a little bit of super glue gel to attach the base of your plant to a small lava rock. (You can use any type of rock, but lava rock is very porous, which gives the roots something to grip onto.) Then bury the whole rock and it’ll keep the plant weighted down until the roots get established. How cool is that!

Tip 7: Use glue to attach driftwood together

In fact, super glue isn’t just for plants; you can also use it to connect driftwood pieces. For example, if you wanted to create an underwater tree, you can attach little sticks to a larger stick (the trunk) with super glue gel and then just chip off any excess glue with an X-acto knife. Check out SerpaDesign’s awesome moss ball tree as an example.

Moss ball tree created with super glue (source: SerpaDesign)


Tip 8: Use glue to attach rocks together

Amazingly, you can actually attach hardscape rocks together to make the perfect aquascape. Jurijs Jutjajevs is a famous German aquascaper who shows off this crazy technique where you rubber band the two rocks together, put a fluffy piece of cigarette filter in the crack in between, and then lightly soak the filter with liquid super glue (not super glue gel that we usually use). I haven’t tried this yet, so check out his tutorial for the full instructions.

attaching hardscape rocks with super glue and cigarette filter

None of my plants or fish or shrimp have ever died from using super glue (except for that first anubias nana petite), so don’t be afraid to use this miracle adhesive to create that dream aquascape stirring around in your head!

Question of the Day

What tips do you have for using super glue in aquariums? Comment below to share your experiences because I’d love to hear them. Take time to enjoy your aquariums and I’ll see you next time!


Subscribe to my YouTube Channel for practical fish care tips for busy aquarists and follow me on Instagram for more updates! 🎮❤️🐟

Saturday, July 20, 2019

How to Choose and Add Aquarium Plants


So, you want to start a planted tank but aren’t sure which plants to use. Keep watching as I share how I research different species and plant them to make a lush jungle tank.

Topics include:
▶ How to research aquatic plants
▶ Where to buy live aquarium plants
▶ How to plant aquarium plants
▶ Melting and algae problems with new plants
▶ Aquarium cycling with plants

Materials I Used

Live aquarium plants
Alum
Aquascaping tweezers
Lead plant weights
Root tab fertilizer
Super glue gel
Green sewing thread
Aquarium water test kit

Resources

Follow the Shy Guys Tank Build
Plant Dip for Snails
How to Plant in Sand Aquariums


Subscribe to my YouTube Channel for practical fish care tips for busy aquarists and follow me on Instagram for more updates! 🎮❤️🐟

Saturday, June 29, 2019

How to Set Up a Planted Tank with Sand Substrate - Part 1

Is it possible to grow aquarium plants in sand substrate? Some say yes, same say no… keep reading to find out how I set up a 20-gallon jungle style tank using two kinds of sand!


Topics include:
▶ Preparing the aquarium
▶ Experiment to test sand substrate with plants
▶ Setting up the equipment
▶ My plan for cycling with live plants

In the next video about this tank, I’ll cover how I selected, purchased, and added live aquarium plants to create a jungle paradise for my shy fish.

Resources:
Sand for a Planted Aquarium?
Sand Showdown: Pool Filter Sand vs Nat Geo Aquarium Sand
5 Things I Wish I Knew Before Growing Rooted Aquarium Plants

Saturday, June 15, 2019

How to Fight Aquarium Algae in 11 Easy Steps

Don’t you hate having to constantly battle algae? Keep watching for an easy, step-by-step maintenance routine to getting rid of algae and preventing it from coming back!


Note: this is just a starting point to help beginners who need general, actionable advice on how to begin tackling their algae problems. Every aquarium is different, so in a future video, I'll cover the longer process of how to balance and fine-tune a planted tank's parameters.

Resources
Top 5 Tips for Beating ALGAE in Your Fish Tank!
Algae in the planted aquarium - Systems design and control
Aquarium Plant Deficiency Diagram

Saturday, May 18, 2019

The Top Fish to Avoid in a Planted Aquarium

Don’t you hate it when you’ve got beautifully planted tank and your brand-new fish demolishes everything? Keep watching to find out who made it on my list of notorious plant destroyers that you should avoid.


I’ve spent the better part of this year researching the perfect plants, hunting them down, and then carefully nurturing them in a 20-gallon aquarium. After months of growing without interference, it’s now time to add fish. But the last thing I want to do is accidentally add some creature that would turn this lush jungle into a deserted wasteland. I know saltwater fish are usually labeled as “reef safe” or not. So why don’t they do that with freshwater fish and plants? I did a little digging on the Internet and came up with three categories of fish: those that are definitely dangerous to plants, those that might be a little risky, and those that I heard a rumor from a friend of a friend about. So, don’t forget to comment below with any fish or invertebrates you’d add to the list.

The Chronic Offenders

  • Silver dollar fish
  • Monos and scats (brackish water)
  • Buenos Aires tetras
  • Goldfish and koi
  • Many types of African or larger cichlids (e.g., mbunas, uaru cichlids, flowerhorns, oscars)
  • Monster fish in general (e.g. stingrays, large catfish and plecos, pacus)
  • Larger crayfish
Buenos Aires tetras
Buenos Aires tetras (source)

There are many articles that suggest "goldfish-safe" or "cichlid-safe" plants, such as:
  • Anubias, java fern and java moss that can be attached to rocks to avoid uprooting
  • Fast growing vallisneria or hornwort
  • Large potted plants like an Amazon sword
  • Certain floating plants or plants that grow above water like pothos
Planted tank with albino cory catfish, java fern, and anubias
Java fern and anubias attached to hardscape

The Casual Snackers

  • Mollies
  • Florida flagfish
  • Larger gouramis
  • Bristlenose plecos (specifically likes Amazon swords)
Orange balloon molly fish
Balloon molly fish

The Rumored Bad Boys

  • A bala shark tore up carpeting plants
  • Siamese algae eaters mowed down newly planted vallisneria
  • Larger snails such as black devil snails (Faunus ater), Columbian ramshorn snails (Marisa cornuarietis), Sulawesi rabbit snail (Tylomelania gemmifera), and some of the largest species of apple snails (Pomacea canaliculata)
Orange rabbit snail
Sulawesi rabbit snail (source)

Thankfully, none of the fish I got for this community tank are on this list so I think I’m safe for now. Honestly, the greatest danger to my plants is my own black thumb, so ya’ll can be praying for me. 😉

Question of the Day

What fish or inverts would you add to this list? Comment below to share your experiences because I’d love to hear them. Take time to enjoy your aquariums and I’ll see you next time!


Subscribe to my YouTube Channel for practical fish care tips for busy aquarists and follow me on Instagram for more updates! 🎮❤️🐟

Saturday, April 13, 2019

5 Things You Need to Know About Planted Aquarium Lighting

If you’re getting into planted tanks, learning about lighting can be overwhelming. Keep reading to find out the 5 things I wish I’d known about lighting when starting my first planted tanks.


If you want to play with live aquarium plants, lighting is one of the key building blocks that you have to learn about. The goal with lighting is to grow plants, enhance their coloration, and of course minimize algae. When your lighting is out of whack with the available nutrients, your plants can end up failing to thrive or being covered with so much algae that you can’t see them anymore. So let’s dive into my top five list for lighting:

Tip #1 : Buy a planted tank LED light

Yes, you can use the default light that came with your aquarium kit or get a really cheap light, but I find they’re usually not strong enough or don’t last very long. Some people build their own LED lights, especially if they have a giant fish room with multiple aquariums, because lighting can get really expensive. But if you only have a few tanks like me, light companies like Fluval or Finnex are pretty good at what they do. Buying quality lighting from them ensures that your plants will get the full spectrum they require.

DIY LED aquarium lighting
Homemade aquarium lighting by the King of DIY

Tip #2: Get a light that covers your entire tank

Some lights aren’t great at light dispersion or spread, which means the plants right underneath the light get lots of photons but the plants on the edges of the tank are pretty shaded. Now you can work around this by planting high light plants in the middle and low light plants on the edges. However, most people just get a better light or buy multiple lights if they have a large aquarium to cover.

Multiple lights on planted aquarium
Multiple lights used on large planted aquarium (source: American Aquarium Products)

Tip #3: Make sure your light is strong enough

Speaking of making sure all your plants get enough light, you also want to consider the brightness in your aquarium, especially if you have a deeper tank. You may hear people talk about a light’s PAR (Photosynthetically Active Radiation) rating, which refers to the light's strength. There’s a lot of debate on how much PAR is required, but the rule of thumb I’ve heard is that low light plants need 15-30 micromols of PAR, medium light plants need 35-50 micromols, and high light plants need over 50 micromols (plus CO2 injection to avoid algae). Some products will list the PAR rating, but other times I’ve had to search online for the PAR readings that other hobbyists took. If you’re lucky, your local fish club may have a PAR meter that you can rent (because they’re super expensive).

Tip #4: Use an outlet timer with your light

Why do you need a timer? Because if you forget to turn on the lights enough, your plants will get sad and lose their leaves. If you give them too much light (or leave them on 24/7), you’ll have so much algae and green water, you probably won’t be able to see into your tank anymore. How long to turn on your lights really vary from tank to tank. If you have a ton of fast-growing plants in a high tech tank, you may leave that light on up to 12 hours a day. But if you have slow growing plants in a cold water tank in a room that already gets a bunch of ambient lighting, maybe you set your timer closer to 5 hours. Some people split up their lighting so that it’s on in the morning, turns off while they're at work or school, and then is on again at night.

aquarium light on a mechanical timer

Tip #5: Lessen your lights in the beginning

If you remember my previous post, I mentioned how new plants in your aquarium need time to acclimate to their new environment. During those beginning stages, they’re not going to grow a lot, so if you provide a lot of light, the plants aren’t going to use it as much, and algae is going to take advantage of it instead. Therefore, some people recommend starting your timer for only six hours a day for the first few weeks, and then gradually increasing to eight hours or beyond afterwards.

Bentley Pascoe said that if you have a dimmable light like the Fluval Plant Spectrum LED light, he actually dims the lights for his new plants. With an 18-24” tall tank, he starts off the light at 50% strength for the first two weeks, checks for plant versus algae growth, ups it to 65-75% strength if the plants are doing well, and then keeps increasing the light strength until he hits the maximum amount he wants. For shorter tanks, he’ll start the light off at 25-35% strength and then slowly increase from there. Genius!

Question of the Day

What’s your favorite type of aquarium light and how long do you have it on for? Comment below to share your experiences because I’d love to hear them. Take time to enjoy your aquariums and I’ll see you next time!


Subscribe to my YouTube Channel for practical fish care tips for busy aquarists and follow me on Instagram for more updates! 🎮❤️🐟

Saturday, March 16, 2019

How to Boost Root Growth in Aquarium Plants

So you want to try keeping stem plants, carpets, rosettes, bulbs, or other rooted plants in a planted tank, but after buying your first few, they ain’t looking too hot. Keep watching as I reveal the top 5 things I’ve learned so far about growing healthy roots for healthy plants!


When I first started dipping my toe into the aquascaping world, I went with your beginner plants – java fern, anubias, bolbitis, and so on. What do all of these have in common? They’re rhizome plants that that you can pretty much glue to a rock and treat it like a piece of aquarium decor. Very hardy, don’t need much light, hard to kill.

Eventually, I wanted to broaden my horizons and get into the world of rooted plants that actually need soil or substrate to live in. That totally opened up my options to stem plants, carpeting plants, crypts, bulbs, you name it! I mean, we’re talking level 2 stuff here, right? Hah! That also means I had to be prepared to face level 2 problems and outright failures. So, come along with me as I reveal the lessons I’ve learned so far when it comes to growing healthy roots for healthy plants!

Tip 1: Leaves may melt off after you first plant them

First off, I learned that at the plant farms, most aquarium plants are actually grown emersed (above water with only their roots and substrate covered in water) rather than submersed (grown entirely underwater). Crazy, right? The reason why they do that is because aquatic plants grow much bigger and faster when they have unlimited access to carbon dioxide from the air, and their leaves are also free of algae and snail eggs. However, when we take those emersed grown plants and plunge them into the water, those leaves go into shock and often melt off, leaving you to think that you bought a dud. Don't throw the plant away! Leave it in your tank, cut off any dying, emersed grown leaves, and eventually the new submersed grown leaves will pop out, probably looking a little smaller and shorter than before. You’re essentially paying for the healthy roots on a plant, not the leaves.

Emersed vs submersed growth in cryptocoryne parva
Emersed vs. submersed grown leaves on a crypt parva (source: spec-tanks.com)

Tip 2: Don't move your rooted plants if at all possible

Once you’ve picked a spot for your new plant, don’t move it. Unlike rhizome plants that allow you to frequently redo your aquascape just by moving the stone or driftwood they're attached to, rooted plants need time to settle in and become, well, rooted. Every time it gets uprooted – whether because you’re rescaping, you accidentally bump it when gravel vacuuming, or you have a jerk of a fish who likes to dig – you’re basically pushing the reset button for that plant and it has to get used to its surroundings all over again. It’s not going to grow well until it feels nice and stable for a while. (P.S. Plant weights can help keep your plants down until they grow more roots.)

Tip 3: Make sure the substrate is deep enough to grow roots

So, what’s the best way to make a rooted plant feel nice and comfortable? Well, I’m not going to get into a big debate about which brand of substrate is superior. Just remember: regardless of what kind you choose, make sure you use enough of it. Some of you might be tempted to buy something really high quality and expensive, which means you may not have the funds to get a lot of it. Most planted tank sources recommend a total substrate depth of 2 to 3 inches (or 5 to 8 cm). That way your plants have enough room to grow deeper roots and not get uprooted at the slightest touch.

Tip 4: Pay attention to the particle size of the substrate

Speaking of substrate selection, I know I just said that I didn’t care what kind you bought. That being said, you have to make sure the substrate particles aren’t too big or too small. If you go too big and have the equivalent of river rocks for your ground cover, the gaps between the stones are too wide and the roots won't anything to hold on to. (Again, I’m talking about rooted plants, not rhizome ones that can hold on to practically anything.)

Aquarium using river rock as substrate
River rock is too big of a substrate for most planted aquariums (source: Reddit)

If you go with a really fine sand, like Caribsea Super Naturals sand, there’s hardly any space between the particles for the roots to grow in. The sand is going to compact way too much and end up smothering the roots to death. Therefore, if you want to use sand, make sure it’s much coarser and larger in diameter, like Seachem Flourite black sand.

Tip 5: Use fertilizers to enhance root and shoot growth

Okay, so you’ve got your perfect substrate, you’ve planted your rooted plants, and you pinky swear not to move them. But they’re still not thriving and staying rooted for some reason. What else can really encourage good root growth? First off, if you're using an inert substrate that doesn't innately contain any nutrients, don't forget to add fertilizers into the substrate in the form of root tabs. Most aquarium plants consume nutrients from the ground and from the water column, but which one they use more depends on the species.

Another tip I heard was from Aquarium Co-Op, a retail and online store that sells live aquarium plants. Remember in the beginning of the article , where I talked about emersed versus submersed grown plants? Well, when Aquarium Co-Op gets their shipments from the plant farms, they actually try to start the process of converting plants to submersed grown, and their secret sauce for encouraging roots to grow faster is using a combination of their own Easy Green all-in-one fertilizer and Seachem Flourish Advance. Flourish Advance is described as a natural phytohormone supplement that “dramatically stimulates the growth of both roots and shoots in aquatic plants.” The ingredients include potassium, phosphates, calcium, and magnesium, which are some of the basic building blocks for plants.

Aquarium Co-Op warehouse holding tanks for live aquarium plants
Aquarium Co-Op starts converting plants to submersed growth before selling to customers

When I was having problems with plants staying rooted in my betta tank, I started adding this magical juice to my regular Easy Green dosing, and boom, no more floating plants! It’s too early to tell whether or not this definitively works for me, but Aquarium Co-Op is buying this stuff by the gallons so you can be sure they wouldn’t be wasting their money if it wasn’t worth it.

Question of the Day

What are some lessons learned about planted aquariums that you wish you'd known as a beginner? Comment below to share, and I may include them in the next plant tutorial article. If you missed Part 1 of this series, check out my 5 Tips for Starting Your First Planted Aquarium. Take time to enjoy your aquariums, and I'll see you next time!


Subscribe to my YouTube Channel for practical fish care tips for busy aquarists and follow me on Instagram for more updates! 🎮❤️🐟

Saturday, February 9, 2019

How to Kill Cyanobacteria – Is the Natural or Chemical Way Best?

Remember that beautiful planted tank I designed for my betta? Well, it ain’t paradise any more because we've got cyanobacteria, baby! Keep reading as I talk about what causes it, the natural versus chemical methods I used to treat it, and which one worked the best!


All I want is a super easy, low tech, low maintenance aquarium to just sit back and enjoy when I’m stressed at work. Unfortunately, my office tank had a reoccurring issue with, well, multiple types of algae, and one of them was blue-green algae, or more accurately, cyanobacteria. No longer was I calm and relaxed when gazing at my betta fish Soundwave. Instead, his home was an eyesore and constant source of stress… (Why oh why don’t you look like the aquascapes on my Instagram feed?)

Cyanobacteria or blue-green algae in planted aquarium
Cyanobacteria outbreak while on vacation (source: Keudn from Reddit)

Causes of Cyanobacteria

There have been lots of studies done on what causes cyanobacteria in aquariums, but nothing is concrete because the bacteria is so genetically diverse and can rapidly spread through practically any ecosystem - freshwater, saltwater, or on land. Potential causes reported on aquarium articles include:
  • Dirty tanks with an excess ammonia (hmm, my ammonia measured 0 ppm)
  • Anaerobic areas from lack of flow (hmm, my algae started right under the filter output)
  • Excess light (hmm, my timer’s only on for 5 to 6 hours per day)
  • Very low nitrates... or very high nitrates according to other sources
Ok, so clearly there’s a lot of conflicting info out there on causes of cyanobacteria. What about the remedies? Most people say it’s a pain to get rid of and spreads like wildfire. I did find that when I rubbed off some slime from a bucephalandra plant up high, it landed somewhere down below and started conquering my staurogyne repens.

Blue green algae in planted aquarium

Natural Treatment for Cyanobacteria

The natural remedy I followed came from a blog called AQUAdesign with the following instructions:
  1. Manually scrub off the algae from all surfaces (which shouldn’t be difficult because it just flakes off in sheets) and then gravel vacuum up as much of it as possible, removing up to 50% of the water.
  2. If you have low nitrates, use fertilizers to dose it up to 20 ppm.
  3. Turn off any CO2 and use an air stone (with air pump and airline tubing of course) to increase oxygenation.
  4. Cover your tank with a black trash bag and tape, keep the aquarium light off, and do a blackout for three to four days. Don’t worry, your fish will be fine during this brief fasting period.
  5. After the blackout, do a large water change to remove all the dead algae, redoes your fertilizers back to 20 ppm nitrates, turn on the light and CO2, and increase flow to avoid dead spots.
fish tank blackout to treat cyanobacteria

And what do you know? The blue-green algae was gone! I didn’t have to use any expensive meds and the treatment was relatively painless… until the cyanobacteria came back again 6 weeks later. Ok, no more Mr. Nice Guy. I’m going in with guns a-blazing!

Chemical Treatment for Cyanobacteria

The chemical method I heard was from Aquarium Co-Op, and it goes something like this:
  1. Manually remove all algae and gravel vacuum just like before.
  2. Clean your filter – including intake sponges, sponge filters, foam inserts, etc.
  3. Nuke your tank with one full dose of erythromycin per the manufacturer’s instructions and let it sit for seven days. (In the United States, it is sold by brands like Fritz Aquatics and API.) If you have an extra tank lying around, you can remove any animals, but this antibiotic is safe for fish, invertebrates like shrimp and snails, and plants.
  4. After seven days, do a large water change to remove all dead algae. You can continue to do more water changes and even use activated carbon to remove the remaining medication.
  5. If it’s a really bad case, you may have to follow up with a treatment or two. Thankfully, erythromycin will not harm your beneficial bacteria, according to Aquarium Co-Op and in my own experiences.
And voila! It’s been four months since the chemical treatment, and I haven’t seen any hint of that evil blue-green slime. Soundwave the betta is no worse for wear, and I can finally breathe a sigh of relief and get back to enjoying his tank!

5-gallon planted betta aquarium

Question of the Day

Have you ever dealt with cyanobacteria, and if so, how’d you get rid of it? Comment below to share your experiences because I’d love to hear them. Take time to enjoy your aquariums and I’ll see you next time!


Subscribe to my YouTube Channel for practical fish care tips for busy aquarists and follow me on Instagram for more updates! 🎮❤️🐟


Wednesday, January 16, 2019

5 Tips for Starting Your First Planted Aquarium

So you’re wanting to make the switch from fake to live aquarium plants, and you’ve already done a bunch of research on lighting, substrate, and so forth. I’m going to let you in on the 5 things I wish I knew about planted tanks that most beginner tutorials never cover. I'm not talking about basic level 1 knowledge like “Put your lights on a timer,” but more like level 2 stuff that you don’t figure out until way later when you happen hear a random comment in a 4-hour live stream.


Now I really like the natural look for my aquariums, which I initially tried to imitate using fake plant decor. However, I eventually decided to try live plants because everyone was going on and on about how great it naturally improves water quality, and you know me, I’ll try anything that saves me time.

Fish tank with natural-looking fake plants

Tip #1: New planted tanks will get algae

The first thing I learned is that planted tanks don’t necessarily save time (at least at first). With my fake aquarium decor, I never turned on the lights unless I was standing directly in front of the tank because my parents taught me not to waste electricity. That also means I never had algae growth. The fact is new planted tanks will get algae and that’s normal. In the beginning stages as your plants are getting settled, you’ll have to spend the time removing algae regularly, scraping down the walls, and keeping on top of water changes to reduce excess nutrients.

One time I let my newly planted betta tank go for two weeks without a water change, and when I came back from vacation, I had a massive brown algae explosion! Lesson learned, for sure.

Algae in a new planted betta tank

Tip #2: Don't fertilize as soon as you get the plants

Contrary to your natural inclination, don't fertilize right after you set up your new planted tank. Because the plants are still in shock and getting used to the new water parameters or substrate they’re in, they’re not going to grow a lot at first. Once they’ve gotten settled in and a little more rooted, then start slowly adding your root tabs and water column fertilizers – maybe at quarter or half strength at first, and then gradually increasing it to a balanced amount. Excess nutrients in those early days will lead to more algae.

Using Seachem Flourish tabs in a planted betta tank

Tip #3: Fast growing plants die quickly & slow growing plants die slowly

Speaking of which, you often hear people say that you should use fast growing plants in your newly planted aquarium so they can suck up the excess nutrients very quickly and starve out the algae. Well, just remember tip #3: fast-growing plants tend to die quickly, whereas slow-growing plants will die more slowly. As you’re learning how to grow plants underwater, slow-growing plants are a little more forgiving and will give you some time to react to those yellowing leaves you see and adjust accordingly, and usually they’ll recover and bounce back. Whereas fast growing plants will just die and then you’re out the money.

sad and happy buce in planted aquarium

Tip #4: Plants will die, but consider it money well-spent

With regards to moolah, just start with the expectation that plants will die on you, even the beginner ones that are supposedly bulletproof. I have killed java fern, anubias, vallisneria, and even a floating plant. I mean, some of these things are practically invasive if you hear people talk, and yet I’ve managed to massacre them all for one reason or another. Part of me was like, “Wow, I just flushed $30 down the toilet.” But the advice I heard was, “Consider this learning experience like a workshop.” You might spend $30 on a workshop to learn about planted tanks, right? So this is just the hands-on, real-world version of it in your home, where you get to learn from your mistakes first hand and do things differently next time.

dying, disintegrating dwarf water lettuce in fish tank

Tip #5: Get your plants from local fish auctions or hobbyists that live near you

Rather than spending the big bucks on plants that have been shipped to a fish store or are purchased from an online retailer, try buying from local hobbyists. Plants sold that way are generally much cheaper, you don’t have to pay for or possibly have them damaged in shipping, and they’ve usually already been acclimated to living in water parameters similar to yours. Sometimes certain plants just won't thrive in your water. But you know what, your fellow fish keepers living in the same area know what plants do work, so follow their recommendations and ask for a few clippings from their tanks.

ludwigia repens or broadleaf ludwigia in a planted tank
My new ludwigia repens I bought from a local aquarist 😍

In my plant keeping journey, I’ve definitely seen the amazing impact live plants have on reducing my nitrate levels in aquariums, and with the help of these level 2 hints, I've been a lot more successful keeping them alive. Huge thanks to my fellow aquarists for sharing their knowledge. Because of them, my eyes have been opened to so many beautiful species that I can’t wait to try!

Related Links
How to Set Up an Easy Betta Planted Tank
Bucephalandra Care Guide
Plant Dip for Snails

Question of the Day

What tips do you wish you knew before starting your first planted tank? Comment below to share your experiences because I’d love to hear them. Take time to enjoy your aquariums and I’ll see you next time!


Subscribe to my YouTube Channel for practical fish care tips for busy aquarists and follow me on Instagram for more updates! 🎮❤️🐟
Saturday, September 29, 2018

Aquarium Plant Dips for Snails – Bleach, Alum & Copper Comparison


I’m just going to straight up say it: I don’t like snails. Pest snails, pet snails... they’re just not for me. So how do you prevent unexpected guests from hitching a ride on your aquarium plants? Like any good beginner hobbyist, I did a bunch of online research on plant dips to find out what methods will remove hitchhikers without killing my aquarium plants. And right from the start, there seemed to be a lot of differing opinions, especially on what will get rid of both snails and snail eggs. So I decided to run some scientific experiments to see for myself.

Since my tanks are currently snail free, I reached out to Greg Sage from Select Aquatics, who has a long-running fish breeding business. Huge thanks to Greg for providing me three clumps of java fern, which he put in his most snail-infested tank for this experiment. (Pro tip: snails can be very useful for cleaning up excess food in fry tanks.) Don’t forget to check out his rare livebearers and green dragon plecos for sale at selectaquatics.com.

Experiment Objectives

The three plant dipping methods I decided to try this time were bleach, alum, and copper medication. The criteria I’ll be judging these methods on is:
  1. Does it get rid of snails?
  2. Does it also neutralize the snail eggs?
  3. Did the plant survive the treatment?

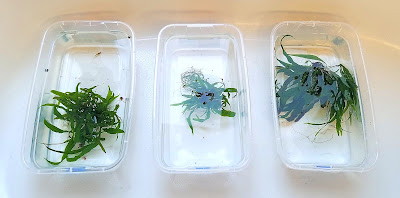
Bleach, alum, and copper medication dips for aquarium plants to eliminate snails and snail eggs

Experiment Procedure

The plants were kept in shoebox-sized plastic containers at room temperature around 70°F, and they received daily indirect sunlight through a frosted window. Snail eggs supposedly hatch in two to four weeks, so I planned to run the experiment for at least a month. Since the tubs had no filtration, I did 100% water changes (and added a little all-in-one liquid fertilizer) twice a week to remove surface scum and stagnant water. Java fern is pretty hardy, so I also ran some supplementary tests to see the treatments' effects on more delicate plants like vallisneria and cryptocoryne spiralis.

Testing bleach dip, alum dip, and copper medication on aquarium plants like java fern

Bleach Dip

There are many different concentrations and treatment lengths for bleach, so I chose to follow the instructions provided by the online aquatic plant seller where I bought my val and crypts.
  1. Mix up 1 cup of regular bleach (or 3/4 cup of concentrated bleach) with 19 cups of room temperature water in a bucket.
  2. Completely submerge the plant in the bleach solution for 2 minutes. 
  3. Dump out the bleach water, fill up the bucket with room temp water again, mix in 1 tsp of dechlorinator like Seachem Prime, and let the plant soak for 3 minutes. 
  4. Repeat the last step of soaking in fresh, heavily dechlorinated water a couple more times.
And that’s it! After the initial bleach treatment, I just floated the java fern in fresh, clean water with a little fertilizer for 30 days to see if any of the snail eggs survived.

Alum Dip

Alum, or aluminum potassium sulfate, is a white powder you can commonly find in the spice aisle of your grocery store. It’s found in baking powder as a leavening agent that causes baked goods to rise and is used for home pickling recipes because it’s both an acid and an astringent. Many sources recommend it as a gentler method compared to bleach and therefore should be more suitable for delicate plants. I chose the following recipe:
  1. Mix up 1 Tbsp of alum per gallon of water.
  2. Let the plants soak in the solution for 3 days. 
  3. Rinse the plants thoroughly with fresh water.
And then like the bleach method, I quarantined the plants for the remainder of the 30 days in fresh water to see if any snail eggs hatched.

Copper medication dip for killing freshwater snails on java fern

Copper Dip

Copper medication like Seachem Cupramine is commonly used to treat fish for external parasites, and the bottle always come with a warning “Not Safe for Invertebrates!” So on the PlantedTank.net forums, there’s a guy named Roy (aka Seattle_Aquarist) who recommends the following treatment:
  1. Add 2 drops of Cupramine per gallon of water.
  2. Continue the treatment for the entirety of the 30 days to ensure all the snail eggs have had sufficient time to hatch, which means every time I do 100% water changes, I add two more drops of copper meds.

Experiment Journal

  • Day 0: This morning I started treatment on all three plants. In the bleach tub, all the adult snails were immediately eliminated. By evening, I removed a bunch of dead adult and baby snails from both the copper and alum tubs. As for the eggs, the copper tub’s eggs look normal, like clear snot blobs with light-colored translucent dots inside, whereas the alum tub’s eggs have turned bright solid white. The bleach tub also has a few snot blobs, but I can’t tell if the eggs are affected. Only time will tell.
  • Day 3: No more major snail deaths that I can see, but the bleach tub has brown tinted water – not sure if it’s caused by dead snails or dead leaves.
  • Week 1.5: The copper tub had a planaria outbreak! I removed all of the flatworms except one to see if the copper will kill it.
  • Week 2: The last planarian is still alive even after several days of copper meds, so I removed it. The alum tub is very clean with no baby snails, whereas the bleach tub has hatched more baby snails. I can now see that some of the bleached eggs turned to a white foggy mush while other eggs are intact.
  • Week 3: The bleach tub still has more baby snails and I had to remove a bunch of dying brown leaves. The other two tubs’ plants are much greener with no sign of baby snails (or other invertebrates). I couldn’t see any eggs in the bleach and copper tubs, and the alum eggs are still bright white and pristine like before.
  • Week 4: All the tubs seem to be snail free! Again, no eggs on the bleach and copper tubs, and all the eggs on the alum plant are still solid white just like on day 1. The leaves on the bleach plant definitely look worse than the leaves on the copper and alum plants.

Freshwater pest snail eggs reacting to copper dip and alum dip on aquarium plants
Bleach-treated eggs (left) and alum-treated eggs (right) on Day 0

Supplementary Tests

Before I close out the experiment journal, let me share how these three treatments worked on more delicate plants like vallisneria. The bleach flat out killed the val. All the leaves dropped off and the roots died. So I tried alum and copper with the remaining val and crypt spirallis. I never saw any snails or snail eggs so not sure if there were any to begin with, but I can tell you how the chemicals affected the plants, specifically the val since the crypts didn’t show much difference.

By week 2, the alum had significantly browned all of the emerged leaves on the val into a mushy goo, whereas the emerged leaves in the copper tub had only browned a little and were still pretty firm. However, by the end of week 4, the tides had turned! The alum-soaked val had very green submerged leaves and was sending off shoots with healthy roots. The copper-soaked val, on the other hand, had brownish-red submerged leaves and seemed to be melting away even three weeks after being planted in the main tank.

vallisneria treated by copper dip and alum dip to eliminate pest snails
Green alum-treated val (left) and brown copper-treated val (right) after quarantine

Results and BEEP Rating

So time to summarize the results and give them the BEEP rating (i.e., how Beneficial, Easy, Efficient, and Proven are the methods).
  1. Did it kill the snails? Yes, all three treatments did.
  2. Did it kill snail eggs? I think only the alum method definitively did. The bleach killed some snail eggs but left many intact (maybe because the bleach could only be used for 2 minutes or else the plant will be killed). Unfortunately, those intact eggs regularly hatched throughout the process. The copper seemed to leave intact eggs as well, but I saw fewer baby snails survive since the water always had medication in it.
  3. Bonus: Did it kill planaria and its eggs? I didn’t know there were planaria eggs in the plants as well, but the copper was unable to get rid of the planaria nor its eggs whereas the bleach and alum eliminated them both.
  4. Did the plant survive? The bleached java fern significantly browned, and the bleached val completely died. The alum val fared much better than the copper val, but both chemicals had little effect on the java fern and crypt spiralis.
results from bleach, alum, and copper aquarium plant dip experiment

So the next time I get new plants, I’m going to go with... alum! The top advantages I saw were:
  • Gentle on plants (at least the three I tested it with)
  • Cheap and easily available at grocery stores 
  • Not as dangerous as bleach
  • Efficiently neutralizes both snails and snail eggs
  • Recommended by many aquarists for many years
My second choice would be copper since it was also effective and worked on snails, but it did stunt my val’s growth after 30 days of treatment.

Question of the Day

I hope you enjoyed this experiment as much as I did! There are a bunch of methods I haven’t tested yet, like potassium permanganate, hydrogen peroxide, manual removal, etc. so comment below to let me know what I should try testing next time around. Don’t forget to take time to enjoy your aquariums and I’ll see you next time!


Subscribe to my YouTube Channel and follow me on Instagram for daily updates! 🎮❤️🐟

Saturday, July 28, 2018

Epic Planted Aquarium Showroom — Aquarium Design Group

I got to visit the Aquarium Design Group (ADG) in Houston, TX recently where they have an incredible showroom featuring their custom designed planted, hardscape only, and saltwater aquariums. The Senske brothers have combined art, design, and architecture to make a collection of beautifully sophisticated aquatic installations. They also have a full retail aquarium store where you can purchase live corals and plants, fish, hardscape, aquascaping tools, and more. Here is a visual tour of some of the most impressive fish tanks I saw displayed during summer 2018:


While I don’t have all the details of what each aquarium entails, here is some information I collected from ADG’s Instagram (certain aspects may have been altered):
  • 90P Planted Aquarium: Blyxa “red” sp. in background (used by Amano), uses CO2, Twinstar 900E light with inline dimmer
  • 90cm Tank with Lava Stone: Eleocharis acicularis “mini” (from Tropica tissue culture cup) as carpet, coral moss (Riccardia chamedryfolia) on the rock
  • 20 Gallon Long with Lava Stone: contains bucephalandra, anubias nana petite, and coral moss (Riccardia chamedryfolia); Twinstar 900E light; Carib-Sea white sand?
  • Tripod Archway: Ultum Nature Systems 60U; uses only attached/epiphytic plants such as buce and coral moss (aka riccardia or mini pellia)
  • Wild Discus Hardscape: Planet Aquariums rimless tank with 3M vinyl frosted film as the background; livestock includes wild red Heckel discus, green laser corydoras, cardinal tetras, and angelfish
  • Lake Tanganyika Tank: 460 gallon, 7' x 4' x 4'??
  • West African Tank: 9-foot African riverine hardscape with four Kessil A80 LED lights
  • 425-Gallon Reef Tank

Related Links
Aquarium Design Group
ADG FaceBook page
ADG Instagram


Subscribe to my YouTube Channel for practical life hacks for marriage, parenting, and pet care – so you can care for all the members of your family!

Tuesday, July 17, 2018

BUCEPHALANDRA CARE GUIDE | How to Plant, Grow & Propagate Buce


Bucephalandra is such an easy and beautiful aquarium plant that’s perfect for low tech planted tanks and nano aquascapes, but is it worth the hefty price tag? Keep reading to find out more:

What is Bucephalandra?

Location: This beautiful plant is found along banks of fast-moving streams in Borneo, using its strong roots to attach to rocks. In the aquarium hobby, we usually grow them underwater as submsered, but because of their locale's wet and dry seasons, they can also be grown out of water as emersed plants. There are over 200 varieties but less than 10 named species last I heard.

Size: The plant grows to about two to four (or more) inches in height, and even taller when grown emersed. The leaves are usually half an inch to four inches long, making buce a good plant to grow in the foreground, mid-ground, or attached to hardscape.

Appearance: The most common varieties on the market are usually seen with oval-shaped leaves that have a wavy edge. However, many other varieties can have leaves that are smaller, skinner, straight-edged, and so on. Their colors range from light to dark green, sometimes with purples, reds, and blues mixed in. The leaves are known for having an iridescent sheen with small white dots. Bucephalandra can produce pink or white flowers, although they don’t always survive well underwater.

Growth Pattern: Depending on the variety, buce can creep along laterally, grow in a mat, or grow upright (which seem to be harder to keep according to Rachel O’leary).

Bucephalandra in an aquascaped tank by Aquarium Design Group

How to Care for and Maintain Buce

Most of the care information can be summarized in the chart above, but their care level is fairly easy and similar to keeping anubias. The growth rate is slow (depending on your lighting, CO2, and other conditions). From what I've read, they seem to handle a wide range of temperatures from 70's to 80's °F, as well as a pretty wide pH range of 6.0 to 8.0.

The lighting can range from low in the shade to high near the top of the tank (although if it's too high, you may have algae problems since buce is so slow growing). CO2 is not necessary, but will help of course. Like any rhizome plant, it will benefit from fertilizers in the water column. And finally, buce likes good water movement since it comes from river environments.

Where to Buy Buce

I rarely see bucephalandra at my local fish store, and if I do, it's usually a mystery variety. People don't really sell them at fish club auctions either since they're still relatively rare and grow slowly. Your best bet is to find an online retailer. BucePlant.com has a great website and offers a ton of varieties, so I would definitely check them out (#notsponsored).

Bucephalandra mini coin and wavy green in betta planted tank

I think the reason why buce is so expensive is because it's still new-ish to the hobby and I've heard new laws and restrictions were put in place to help stop the illegal export of buce since it was being overharvested from the wild. So try to buy commercially produced or farm-raised plants if at all possible.

How to Propagate Buce

In the wild, their flowers produce scents to attract beetles for pollination. However in the aquarium hobby, propagation is as easy as cutting the rhizome. Just use some sharp, clean scissors, and avoid cutting the rhizome sections too short.

Bucephalandra flower bud purchased from local fish store

How to Plant Buce

When you receive your new buce, remove any sickly leaves before planting. You can place the buce into the substrate, but make sure to only cover the roots and not the rhizome. You can also wedge it between rocks and crevices in driftwood. If you'd like to attach it directly to the hardscape, you can tie it with thread or fishing line, or use super glue gel (my favorite method).

Similar to crytocoryne plants, bucephalandra may melt with sudden changes in water parameters – like moving it from submersed to emersed or even moving it to a different tank. When buce melts, it loses its leaves and stores nutrients all the way down to the rhizome, so don’t throw away the rhizome. Give it some time to see if it will recover in its new environment.

Conclusion: Plant Rating

In summary, bucephalandra is a beautiful plant with iridescent leaves, is easy to care for, and is perfect for low tech tanks and nano tanks. However, it is relatively expensive, may melt initially, and takes lots of patience since it's slow growing. So I'm going to give the bucephalandra 4 stars out of 5. If you’re looking for something a little unique that’s not anubias or java fern, definitely check it out!

Related Links
50 Shades of Buce!
Buce Infographic
Growing Bucephalandra

Question of the Day

Do you have any care tips for bucephalandra? Do you think buce is worth all the hype? Comment below to let me know what you think.


Subscribe to my YouTube Channel for weekly videos on relationship advice and pet care tips – to help you care for all the members of your family! 🎮👨🏻‍❤️‍👩🐟