Pages

Saturday, July 27, 2019

How to Aquascape with Super Glue – 8 Tips

Looking to make a really cool aquascape? Then I hope you’re ready to get your hands sticky! Keep reading to find out 8 tips and tricks for building a planted tank with super glue.


After my last post on adding plants to the Shy Guys jungle tank, I wanted to delve a little deeper into the use of super glue in aquascaping. Cyanoacrylate, the primary ingredient in super glue, is aquarium-safe and is totally a miracle tool for attaching plants to hardscape (compared to hand-tying plants using sewing thread). Over time, I’ve picked up more and more clever ways on how to apply this stuff.

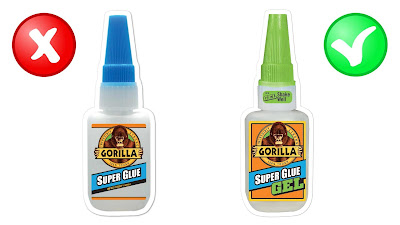
Tip 1: Use super glue gel

For those of you who didn’t know, super glue is commonly used to attach moss and rhizome plants (like anubias and java fern) onto hardscape such as rocks and driftwood. And you don’t want to use regular liquid super glue, but rather super glue gel. The gel type is thicker and easier to manipulate when it comes to attaching delicate plants exactly the way you want.

Liquid super glue versus super glue gel

Tip 2: Glue the roots of the plant

Now when you’re gluing down the rhizome plants, make sure not to glop it all over the rhizome. I’ve totally killed off some anubias nana petite because it was so tiny and I ended up suffocating the plant with glue. Instead, focus on gluing the roots down, and your plant will do just fine.

Tip 3: To avoid sticky hands, use nitrile gloves and the bottle cap

The problem with super glue is that it’s really easy to accidentally get it all over your hands, so wear nitrile gloves to protect your skin. Also, use the cap of the super glue bottle (rather than your fingers) to firmly press the plant down for 30 seconds. Super glue cures fairly quickly in water, but I find that I still need to hold the plant in place for that initial drying period in order to get a firm bond.

use super glue to attach aquarium plants to hardscape

Tip 4: Cover the glue with sand or soil

Word of warning: once the glue is placed in water, it will dry into a white color that a lot of people don’t like (which is another reason why you should use the glue sparingly). However, you can sprinkle and rub in some sand, soil, or other fine substrate into the glue as it’s curing, which totally hides the white color and gives it a more natural appearance.

Super glue in aquarium by StrungOut from ThePlantedTank
White super glue in a planted tank (source: StrungOut)

Tip 5: Use glue and sewing thread for more stability

As awesome as super glue is, unfortunately it’s not always sufficient for holding together top-heavy plants. In my previous video, I mentioned that I have a very large anubias in the Shy Guys tank that hides the sponge filter, and what I did was first glue its roots onto the rock, and then I used some green sewing thread to tie it down for more stability. Without the thread, I find that these taller plants can sometimes fall over and break the glue bond.

anubias rhizome tied to rock with sewing thread

Tip 6: Glue stem plants to rocks to weigh them down

Remember how in my previous post, plants kept floating away from the substrate? Instead of using plant weights, just use a little bit of super glue gel to attach the base of your plant to a small lava rock. (You can use any type of rock, but lava rock is very porous, which gives the roots something to grip onto.) Then bury the whole rock and it’ll keep the plant weighted down until the roots get established. How cool is that!

Tip 7: Use glue to attach driftwood together

In fact, super glue isn’t just for plants; you can also use it to connect driftwood pieces. For example, if you wanted to create an underwater tree, you can attach little sticks to a larger stick (the trunk) with super glue gel and then just chip off any excess glue with an X-acto knife. Check out SerpaDesign’s awesome moss ball tree as an example.

Moss ball tree created with super glue (source: SerpaDesign)


Tip 8: Use glue to attach rocks together

Amazingly, you can actually attach hardscape rocks together to make the perfect aquascape. Jurijs Jutjajevs is a famous German aquascaper who shows off this crazy technique where you rubber band the two rocks together, put a fluffy piece of cigarette filter in the crack in between, and then lightly soak the filter with liquid super glue (not super glue gel that we usually use). I haven’t tried this yet, so check out his tutorial for the full instructions.

attaching hardscape rocks with super glue and cigarette filter

None of my plants or fish or shrimp have ever died from using super glue (except for that first anubias nana petite), so don’t be afraid to use this miracle adhesive to create that dream aquascape stirring around in your head!

Question of the Day

What tips do you have for using super glue in aquariums? Comment below to share your experiences because I’d love to hear them. Take time to enjoy your aquariums and I’ll see you next time!


Subscribe to my YouTube Channel for practical fish care tips for busy aquarists and follow me on Instagram for more updates! ๐ŸŽฎ❤️๐ŸŸ

Saturday, July 20, 2019

How to Choose and Add Aquarium Plants


So, you want to start a planted tank but aren’t sure which plants to use. Keep watching as I share how I research different species and plant them to make a lush jungle tank.

Topics include:
▶ How to research aquatic plants
▶ Where to buy live aquarium plants
▶ How to plant aquarium plants
▶ Melting and algae problems with new plants
▶ Aquarium cycling with plants

Materials I Used

Live aquarium plants
Alum
Aquascaping tweezers
Lead plant weights
Root tab fertilizer
Super glue gel
Green sewing thread
Aquarium water test kit

Resources

Follow the Shy Guys Tank Build
Plant Dip for Snails
How to Plant in Sand Aquariums


Subscribe to my YouTube Channel for practical fish care tips for busy aquarists and follow me on Instagram for more updates! ๐ŸŽฎ❤️๐ŸŸ

Saturday, July 13, 2019

How to Keep Your Aquarium Sand Clean

Want to use sand substrate in your aquarium, but you’re afraid it’ll be hard to clean? Not a problem! Keep reading as I share my easy tips and tricks for keeping your sand clean and animals healthy.


Recently, I released a post explaining the first steps for setting up a planted tank with sand substrate. Several people asked, “How in the world do you keep that sand clean? Won’t it just get sucked up by the siphon if you try to vacuum it?” Great question! I had the same worries when I first switched from gravel to sand because no one wants to use a substrate that’s hard to clean and could trap excess waste that might harm your fish. But after I teach you a few simple techniques, you’ll realize that there’s nothing to it and it’s just like cleaning gravel… almost. ๐Ÿ˜‰ (By the way, I’m going to be talking about using a siphon to vacuum your aquarium substrate, so if you don’t know what that is or how to use one, definitely check out my water changing article.)

Select the Right Sand

Okay, first off, let’s talk about sand selection. Not all sands are created equally, and if you’re using a very fine, lightweight sand, it’s going to get sucked up more easily in your siphon and you may have to add some more sand occasionally. In fact, word to the wise, you’ll also want to prevent sand from getting sucked up by your hang-on-back or canister filter and ruining the motor – which is exactly what happened to my first AquaClear filter. To prevent that from happening, buy a prefilter sponge (which looks like a cylinder with a hole on one side), and stick it on end of your filter’s intake tube. The added bonus it that it’ll grow beneficial bacteria and prevent any fish or plant leaves from getting sucked up too!

I’ve never had any trouble with aggressively vacuuming my substrate because I use the heavier generic-brand sand sold by Petco and PetSmart. Side note, but I prefer black sand versus a lighter color because fish waste doesn’t seem to show up as much. Some people might say, “Well, why don’t you get a brown colored, natural-looking sand to really hide that mulm?” Personally, I think the fish and plants just seem to really pop against a black background and substrate, so that’s why I prefer it.

Black sand from Petco and PetSmart
Large-grained black sand from Petco

As I was saying before, the Petco sand has large particles that rarely get sucked up because they’re too heavy to make it all the way up the tube. The only time I’ve had problems with this is if I’m using my mini siphon, which is about six inches tall. It seems that the tube portion is just short enough to suck up the sand if I’m not paying attention.

How to Vacuum Sand Substrate

So, how do you deal with sand that keeps getting sucked up in the siphon? Okay, there are three common methods.

Method 1: Hoover above the sand
If your sand is super fine, don’t stick your siphon tube into it. Instead, use the tube to gently swirl water above the sand and then suck up any detritus that floats up into the water column. The great thing about this method is that you’re not really disturbing your aquascape. The sand is still nice and smooth and undisturbed. However, I believe Rachel O’Leary likes to use a chopstick to stir up the substrate a bit and then hover above with her siphon to suck up whatever gets loosened.

Method 2: Vacuum the sand like gravel
If you’ve got a heavier sand like me and really want to get a deeper cleaning, gravel vacuuming is the way to go. What do I mean by that? Just stick the tube down into the sand like an inch or so, suck up some waste, and then when you lift up the tube, the heavier sand particles will fall while the lighter brown detritus continues to rise. Easy peasy! Just like vacuuming regular gravel. I like to systematically clean the tank bottom in a grid-like pattern: vacuum, raise and release, vacuum, raise and release – rinse and repeat until I’ve cleaned about half the tank. And then next week, I’ll clean the other half or wherever looks dirtiest.

using siphon on black sand in red cherry shrimp tank

Method 3: Crimp the siphon hose
The final method is really useful for my shrimp tank. Honestly, this should be my easiest aquarium to clean because I don’t have to wipe off any algae since it provides extra grazing areas for my shrimp. (Pro tip: use razor blades for algae scrapping to avoid scratching the walls up with sand grains.) Unfortunately, I have a really hard time not sucking up the millions of tiny, clear shrimp babies crawling everywhere. It’s incredibly stressful! So, this principle works for both sand particles and any live animals you don’t want to suck up. Just vacuum like normal, but if I see any baby shrimp in the tube, I clamp down on the hose to stop the flow and wait for the shrimplet to eventually crawl its way out. This works for sand as well. Vacuum, crimp the hose, vacuum some more, and then crimp it to stop. It’s like magic!

More Maintenance Tips for Sand

As awesome as these techniques are, they’re not perfect and some grains may accidentally get sucked up anyway. Because of that, my husband Mr. Gamer really doesn’t want me pouring the wastewater down our sink or toilet and accidentally clogging up our plumbing. Instead I just dump it onto our lawn or use it to water our plants. Win-win situation!

As you refill your aquarium, just realize that sand can be easily disturbed if you aim the hose right at it, so lots of people use plastic bags or colanders to lessen the water pressure and prevent their aquascape from moving around. However, my aquariums are tall enough where I can just aim the spout at a tank wall or maybe some dรฉcor to help dissipate the flow.

plastic bag used to protect sand substrate during water changes

In fact, in my 20-gallon tank, I’m trying to maintain a gentle slope in the substrate where the sand is lower in the front and higher in the back, kinda like stadium seating for the plants. However, gravity and my nosy kuhli loaches tend to flatten the sand over time, so I usually take the opportunity during water changes to manually rebuild my little hill as needed. Boom! Clean tank, clean sand… looks great for about 20 seconds until my fish mess it up again. ๐Ÿ˜œ

Does Sand Substrate Cause Toxic Hydrogen Sulfide Gas?

I know there's been some discussion about deep sand beds potentially creating an environment for anaerobic bacteria to grow and producing pockets of deadly hydrogen sulfide gas. I’m not really worried about it with my Shy Guys jungle tank because a) my substrate isn’t that deep (like 3 inches at most) and b) I regularly stab root tabs into my substrate, which messes up sand a bit. Plus, Jason from Prime Time Aquatics, who happens to be a college professor of microbiology, says he’s actually seen hydrogen sulfide bubbles coming from some of his tanks but he’s also running a lot of sponge filters so it’s never really bothered any of his fish.

If you want to learn about my whole process for setting up a planted tank with sand substrate, check out the series here. Take time to enjoy your aquariums and I’ll see you in the next post!


Subscribe to my YouTube Channel for practical fish care tips for busy aquarists and follow me on Instagram for more updates! ๐ŸŽฎ❤️๐ŸŸ

Saturday, July 6, 2019

What Is the Best Food to Feed Betta Fish?

So you got your first betta fish, but there’s like a million types of foods to choose from. Which one is the best? Keep reading as I cover my top favorite foods to keep a betta fish happy and healthy!


For the first couple of betta fish I owned, I just bought a random jar of betta flakes or pellets and fed them the same thing for their entire lives. Poor things! Then I found out that there are a huge selection of goodies that betta fish can eat, and so I started buying and trying everything because nothing’s too good for my baby, right? (Seriously, I think my fish eat healthier than I do.) Anyway, to save you some time and money (and refrigerator space), let me share with you some yummy, nutritious foods that my betta fish go crazy after.

What Do Betta Fish Eat in the Wild?

Betta fish are mostly insectivores that’ll eat any bug (or bug eggs) that falls into the water, as well as zooplankton, crustaceans, etc. In the aquarium world, that means they mostly prefer protein-rich, small-sized, floating foods. Their mouths are scooped upwards and shaped for eating off the surface of the water. That’s not to say they won’t go after your catfish’s sinking algae wafers because some bettas are like little water pigs.

For me, I believe that variety is key! There’s no one magical food that contains all the nutrients and minerals a fish needs. (However, some betta fish are very picky and may not take to new foods unless you mix it together with their favorite snack and/or if you don’t feed them for a few days so they get hungry enough to try something else.) One thing to note is I would avoid any messy or microscopic foods. If you don't have any cleanup crew with your betta, then stay away from certain flake foods, powder foods for fish fry, and Repashy gel food. Many times these messy foods will get into substrate and foul up the water faster because the betta fish can’t find it or reach it.

3 Types of Betta Fish Foods

#1 Prepared Fish Food

First off, let’s talk about prepared foods. Sure, they’re not exactly the most natural-looking choice, but they’re like an all-in-one breakfast smoothie that contains lots of protein and essential vitamins. Floating betta pellets are my favorite because they’re very clean, float at the top of the water for easy access, and are great for measuring out exactly in case you have to leave instructions with a pet sitter. Some people like to pre-soak them to avoid causing bloat in their betta fish, but I usually don’t bother. A few high-quality brands that are popular right now include Hikari, Ocean Nutrition, Northfin, and New Life Spectrum. For smaller or younger bettas, try Hikari pellets because they’re very tiny in comparison to many other brands. I do not uphold to any strict rules like “only feed x number of pellets per day” since pellets can really range in size (and bettas also vary in size and activity level).

Betta fish food pellets
Betta fish food pellets (source: Alibaba)

Another prepared food I’ve tried is Fluval Bug Bites. I like the concept because they’re made out of black solder fly larva – perfect for our little insectivores. Unfortunately, the granules are tiny and sink fairly quickly, which is not ideal for most betta fish but doesn’t deter my very food-motivated betta named Soundwave. It’s kinda like enrichment for him to hunt for every fallen morsel he can find.

Quick note on prepared foods: Don’t let them expire! It could really get your fish sick, and honestly, some people say that the foods are the freshest and most nutritious within the first month to maybe six months of unpackaging them. That’s why I keep mine in the fridge and I label them with the date they were opened.

#2 Freeze-Dried Fish Food

Next up is freeze-dried foods. They're very similar to prepared foods because they’re both dry, usually come in a jar, and last a long time – but the difference is that these are whole foods that are processed a lot less and they’re generally free from bacteria and parasites (unlike live foods). I’ve only bought freeze-dried bloodworms so far, and fish go crazy for them. They float which is great, and they’re like a tasty treat to feed once a week. Other freeze-dried options include tubifex worms, brine shrimp, daphnia… really anything that is small enough to fit into their mouths. Just be careful that the smaller pieces don’t get lost and dirty the water.

freeze-dried bloodworms for betta fish
Freeze-dried bloodworms (source: Prodac)

#3 Frozen Fish Food

I really love the next category: frozen foods. They’re my second favorite thing to feed fish and would be closer to #1 if they could be easily purchased online and didn’t go bad so quickly once you thaw them. They usually come in frozen cubes or sheets. For me, one cube is way too much food for one feeding (unless you have other fish to feed), so I prefer the frozen sheets so that I can break off smaller pieces. I like to thaw them in a small plastic container with a lid, use a baby spoon to drain out any excess liquid and feed a few worms, and then refrigerate the rest for a few days. Make sure not to refreeze anything because the food may have bacterial growth. Also, don’t accidentally leave this stuff out on the counter because it’ll stink to high heaven!

My favorites are frozen bloodworms, brine shrimp, and daphnia. Because their exoskeletons are less digestable, daphnia and brine shrimp fed with spirulina algae are sometimes used as a "laxative" to help betta fish who are constipated or bloated.

frozen bloodworms for betta fish
Frozen bloodworm cubes (source: Alibaba)

#4 Live Foods for Fish

And then we have live foods… this should be the perfect choice, right? It’s the closest thing to what a betta splendens would eat in the wild and provides excellent enrichment, so why don’t I feed them as often? Two reasons: potential diseases and they’re a hassle to maintain. But there are plenty of people who swear by them, especially for conditioning a breeding pair or raising fry, so let’s discuss.

Common suggestions I’ve heard include: live blackworms, daphnia, microworms that you can culture, flightless fruit flies, and even pinhead crickets. Personally I’ve only fed live baby brine shrimp because I happened to be raising some baby honey gouramis, and even though they’re practically microscopic, they swim in these irresistible jerky movements and are great enrichment. My betta fish somehow caught every single one even though they’re itty-bitty.

live blackworms for fish
Live blackworms (source: NeliMartรญn. Der. Beef)

I’ve also tossed a few shrimp culls in my betta tank. Yes, I know that sound a little unpalatable for some people, but I knew they were disease-free, I didn’t want them breeding anymore, and Soundwave had a good ol’ time chasing them down. However, you’ll be happy to know that in his old age, he’s mellowed out a lot and has decided to graciously spare them… for now.

How Much Should I Feed My Betta Fish?

It is really easy to overfeed betta fish in captivity because they always act hungry and beg for food. I personally feed my betta once a day, six days of the week. Some people believe that fasting one day a week or more can prevent bloating, so I designate Sunday as his "day of rest." In fact, adult betta fish can go a week or so without food, so no need to get that pet sitter if you’re just gone for the weekend.

Now I don’t go by the “feed as much as they can eat in two minutes” rule because my betta can gorge himself to death in that amount of time. So, when I first got him, I started off feeding four pellets a day for a week, and then increased to five pellets the next week, and six pellets the next. You see the pattern. If my betta started getting a little on the hefty side, where his abdomen wasn’t a smooth slope but rather protruded like a pregnant belly, then I backed off by one pellet each week until he reached a healthy weight. Or you can skip a feeding or two to help re-balance him a little faster.

overfeeding a betta fish
Don't overfeed your betta fish

This system works with frozen or freeze-dried foods as well because you can start estimating about how much volume his daily portion should be. And again, if he’s getting rotund, just cut back on the amount and you should see immediate results.

Now if you have the opposite problem where he’s not eating, he may be sick so take a close look at his environment, check out his symptoms, and maybe get rid of some expired food. ๐Ÿ˜‰

If you have more questions about betta fish care, I may have the perfect video about it in this playlist. Otherwise, comment below to suggest the next betta tutorial I should cover. Take time to enjoy your aquariums and I’ll see you in the next post!


Subscribe to my YouTube Channel for practical fish care tips for busy aquarists and follow me on Instagram for more updates! ๐ŸŽฎ❤️๐ŸŸ