Pages

Showing posts with label Crochet. Show all posts

Wednesday, January 13, 2016

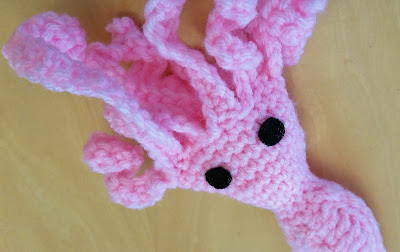
Pattern: Squid Cat Toy with Refillable Catnip Pocket


I really, really like the Kitty Squid crochet pattern from Chronicles of a Yarn Obsession. It's such a staple in my pattern collection when I need a quick, cute gift for my cat-owning friends. Check out the changes I made to make a refillable catnip pocket that will truly drive your kitty wild! =^._.^=

Materials:

  • The materials needed for the Kitty Squid pattern (scrap yarn, black yarn, crochet hook G, tapestry needle)
  • Catnip
  • Scrap piece of fabric (something to wrap the catnip such as a square of 3-4 inches in size, preferably a color that will blend in with the cat toy body)
  • Sewable strip of Velcro (less than 2 inches, preferably white)
  • Hand sewing needle 
  • Sewing thread (pick a color that will blend in with the cat toy body)

Instructions:

1) Follow the Kitty Squid pattern and finish making the squid body and attach the eyes, but don't stuff the body yet or sew it shut.

Crochet squid cat toy with refillable catnip pocket

2) Flip the squid upside-down and open the base of the body. Cut a length of Velcro that will span the width of the squid body opening. 

Crochet squid cat toy with refillable catnip pocket

3) Separate the hook and loop sides of the Velcro. Hand sew the hook side and the loop side of the Velcro just inside the squid body opening. Try to keep the stitches hidden from the outside of the squid. When the Velcro pieces are fastened together, they should close the squid body opening entirely.

Crochet squid cat toy with refillable catnip pocket

4) Place some catnip in the scrap fabric and fold it up to keep the catnip contained. Place the catnip pouch inside the body. If there is still room left in the body, you can put additional polyfill batting or scrap yarn inside. Seal the Velcro together.

Crochet squid cat toy with refillable catnip pocket

5) Watch your cat go crazy for their new toy!

Crochet squid cat toy with refillable catnip pocket

Wednesday, September 2, 2015

Pattern: Puppy in My Hand

Puppy in My Palm crochet amigurumi pattern

My 3-year-old son woke up one morning and said that he dreamed he had a little white dog in the palm of his hand. Despite the fact I haven't crocheted anything new in months, I was determined to make his dream come true. This is an English translation of Waldi by Conni Hartig, with some added notes that made things easier for me. Enjoy!

Puppy in My Palm crochet amigurumi pattern

Materials:
  • 10 crochet thread (I used worsted yarn)
  • 1.5 mm hook (I used a 4 mm size G hook)
  • Polyester filling
  • Back and red embroidery floss for face (I used 6 mm plastic safety eyes and a 9 mm nose)
  • Tapestry needle

Abbreviations:
Puppy in My Palm crochet amigurumi pattern
  • ch = chain
  • dec = sc decrease 
  • hdc = half double crochet
  • inc = sc increase 
  • rnd = round
  • sc = single crochet
  • sl st = slip stitch
  • st = stitch

Instructions:
  • For the legs and the head/body, the pattern is worked continuously in a spiral; do not join.
  • For the tail and ears, work flat and turn the work at the end of each row.

Legs
  • Magic ring, ch 1
  • Rnd 1: 6 sc in magic ring (6)
  • Rnd 2: 1 sc in each stitch around (6)
  • Fasten off, leaving a long tail for sewing

Puppy in My Hand crochet amigurumi pattern

Tail
  • Ch 5
  • Row 1: Skip first st and sl st till the end (4)
  • Fasten off, leaving a long tail for sewing

Ears (make 2)
  • Ch 5
  • Row 1: skip first ch, 2 sc, 2 hdc (4)
  • Row 2: ch 1, 2 hdc, 2 sc (4)
  • Row 3: ch 1, 2 sc, 2 hdc (4)*
  • Fasten off, leaving a long tail for sewing

*I actually changed this to “Row 3: sl st, sc, 2 hdc (4)” for a more triangle-shaped ear.

Head/Body
  • Magic ring, ch 1
  • Rnd 1: 6 sc in magic ring (6)
  • Rnd 2: inc in each st around (12)
  • Rnd 3: sc in each st around (12)
  • Rnd 4: *1 sc, 1 inc* around (18)
  • Rnd 5: sc in each st around (18)
  • Rnd 6: *2 sc, 1 inc* around (24)
  • Rnd 7-8: sc in each st around (24)
  • Rnd 9: *2 sc, 1 dec* around (18)
  • Sew on 2 ears and embroider the face (or use plastic eyes/nose)
  • Lightly stuff head with filling and then continue crocheting head/body
  • Rnd 10: *1 sc, 1 dec* around (12)
  • Rnd 11: dec around (6)
  • Rnd 12: inc in each st around (12)
  • Rnd 13-17: sc in each st around (12) for 5 rounds
  • Lightly stuff body with filling
  • Rnd 18: dec around (6)
  • Fasten off and hide the yarn end inside the body
  • Attach the legs and tail

Puppy in My Hand crochet amigurumi pattern

Leash (optional)
  • Create a foundation chain for as long as you want the leash to be
  • Skip first st and sl st all the way to the end
  • Sew the leash around the dog’s neck

Thursday, May 3, 2012

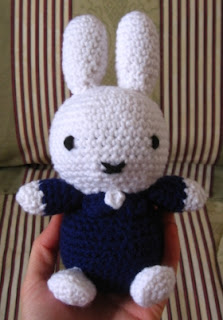
Remix: Miffy the Bunny

Miffy, amigurumi, plushie, plush, bunny, baby bunny, rabbit, baby toy, crochet, crocheted, crochet amigurumi, crochet baby toy, amigurumi rabbit, amigurumi bunny
Thank you so much to Sara Yip for her wonderful Miffy Amigurumi crochet pattern! Without it, I would still be struggling with a very sad, lumpy, knitted... not-Miffy. However, I did make a few edits here and there and, well, everywhere, so here's my slightly remixed version for your viewing pleasure.

Yarn: Red Heart Super Saver (worsted)
Hook Size: 4.0 mm (US G)
US Abbreviations: CC = contrasting color (navy blue in my case), ch = chain, rnd = round, dc = double crochet, sc = single crochet, sc2tog = sc decrease, sl st = slip stitch, st = stitch

Tips:
  • My gauge is a little shorter than most people's so I added extra rows to make the proportions still fit. Feel free to skip 1-2 rows of "sc around" instructions if it looks better that way. 
  • Each piece is worked in continuous rounds; do not join or turn. Use a stitch marker to mark the beginning of each round. 
  • Useful reference links: Clay Miffy, Plush Miffy, Original 2D Miffy
HEAD
Note: I used the head “right side up” when sewing up Miffy, where the first round is the top of the head. That way I could sew on the face and ears while I was 2 rows from completing the head (through the “neck” hole).
  • Using the white yarn, 6 sc in a magic ring
  • Follow instructions as written. For the "Sc around x 6 rounds" step, I increased it to 8 rnds.
  • Pause two rows from the end, leaving an open hole. Create the ears, sew on the face and ears, stuff the head, and then continue with the rest of the head instructions.
  • After the last step, finish off and close the bottom of the head, sewing the yarn end through the head. Snip the yarn end close to the surface so that cut end will retract back inside the head.
EARS (make 2)
  • Using the white yarn, 5 sc in a magic ring. (I increased it to make the ears slightly "fatter")
  • Rnd 1: 2 sc in each sc around – 10 sc.
  • Rnd 2: *Sc in next sc, 2 sc in next sc* repeat 5 times – 15 sc.
  • Rnd 3-9: Sc in each sc around – 15 sc. (I did 7 rnds of sc around, but you may just need 5-6 rnds)
  • Rnd 10: *Sc in next sc, sc2tog in next sc* repeat 5 times – 10 sc.
  • Rnd 11: Sc in each sc around – 10 sc. (Feel free to skip this row if it looks better)
  • Sl st into next st. Stuff the ear and fasten off, leaving a long tail for sewing.
    FACE
    • For the mouth, make a cross with black yarn or embroidery floss. I made the mouth around the beginning/top of the decrease rounds of the head.
    • For the eyes, I used yarn to make Miffy baby safe. For each eye, I made 4 vertical, parallel stitches through the same 2 holes (at the top and bottom of the eye) to create a mostly circular blob of black.
    Miffy, amigurumi, plushie, plush, bunny, baby bunny, rabbit, baby toy, crochet, crocheted, crochet amigurumi, crochet baby toy, amigurumi rabbit, amigurumi bunny

    BODY
    • Follow instructions as directed using the CC. I increased the "sc around" rnds by two to compensate for my gauge and match the head.
    • Ignore the "sc around in top loop" step and just make it into another normal "sc around" rnd (through both loops).
    • After the last step, sl st into next st. Fasten off, leaving a long tail for sewing the head to the body. Do not stuff until after you have attached the arms and legs.
    ARMS (make 2)
    Note: If you prefer, you can make the arms with joins at each rnd (instead of continuous rnds). Then you can skip my impromptu method (bullets #4-5) and use the more common color change technique.
    • Using the white yarn, 5 sc in a magic ring. (I increased it to make the arms slightly "fatter")
    • Rnd 1: 2 sc in each sc around – 10 sc.
    • Rnd 2-3: Sc in each sc around – 10 sc. (I did 2 rnds of sc around, but you may just need 1 rnd)
    • Sl st into next st. Fasten off the white yarn and weave in yarn tail.
    • Using the CC, join to any st on the existing work. I do this by bringing a loop of yarn through an existing st (back to front) and then making a chain st. The next sc should be created in the same st where you made the join.
    • Rnd 4: *Sc in next 4 sc, 2 sc in next sc* repeat 2 times – 12 sc.
    • Rnd 5-7: Sc in each sc around – 12 sc. (I did 3 rnds of sc around, but you may only need 2 rnds)
    • Fasten off and leave a long tail for sewing. Stuff the arm lightly, sew the two sides of the opening together, and then sew the arm to the neck opening of the body.
    • Optional: if the arms stick out too much, try tacking them down to the body.
    FEET (make 2)
    Note: Rnd 3 will create a ridge to better define the bottom of the foot. If you prefer, you can make the feet with joins at each rnd (instead of continuous rnds) so that the ridge will look smoother.
    • Using the white yarn, 5 sc in a magic ring. (I increased it to make the feet slightly "fatter")
    • Rnd 1: 2 sc in each sc around – 10 sc. 
    • Rnd 2: *Sc in next sc, 2 sc in next sc* repeat 4 times; *2 sc in next sc* repeat 2 times – 16 sc.
    • Rnd 3: Through back loops only, sc in each sc around – 16 sc.
    • Rnd 4: Sc in next 4 sc; *sc2tog* repeat 4 times; sc in next 4 sc – 12 sc. (This step and the rest are crocheted through both loops)
    • Rnd 5: Sc in next 4 sc; *sc2tog* repeat 2 times; sc in next 4 sc – 10 sc.
    • Sl st into next st. Lightly stuff and fasten off, leaving a long tail for sewing.
    COLLAR PIECE (make 2)
    • Using the CC, ch 5. 
    • Starting at the second ch from the hook, sl st, dc, dc, sl st.
    • Fasten off, leaving a long tail for sewing.
    BUTTON
    • Using the white yarn, 4 sc in a magic ring.
    • Fasten off, leaving a long tail for sewing.
    Miffy, amigurumi, plushie, plush, bunny, baby bunny, rabbit, baby toy, crochet, crocheted, crochet amigurumi, crochet baby toy, amigurumi rabbit, amigurumi bunny

    FINISHING
    • If you have already attached the arms to the body, sew the feet onto the body next using a seamless join.
    • If you have already completed head (by sewing on the ears and face and stuffing it), stuff the body and then use the yarn tail from the body to attach the head.
    • Finally, sew the two collar pieces to the neck seam and then sew the button in between the collar pieces. 
    • All the yarn ends should be hidden by pulling them through the stuffed animal and cutting off the excess yarn. Enjoy your Miffy!
    Miffy, amigurumi, plushie, plush, bunny, baby bunny, rabbit, baby toy, crochet, crocheted, crochet amigurumi, crochet baby toy, amigurumi rabbit, amigurumi bunny
    (click to enlarge)

    Monday, January 9, 2012

    "Shrinking" AllAboutAmi's Teddy Ornaments

    If you like to knit or crochet amigurumi, you know there's a severe lacking in yarn color choices. It's so hard to match that exact shade of Pac-Man ghost #3, but throughout the years, I've settled on Red Heart Super Saver as my cheap and readily available default. Which means I have tons and tons of random leftover Red Heart yarn scraps in my collection.

    So whenever I come upon an amigurumi pattern that calls for non-worsted weight yarn, I can either a) buy new yarn (no way, I need to use up my stash!), b) make the pattern as is, gauge be darned, or c) alter the pattern to keep the original size. Normally I choose option B, but for AllAboutAmi's Teddy Ornament pattern, I went with option C because well, I didn't want the bears to become super-giant-sized compared to the rest of my Christmas ornaments. Here are my edits in case you're interested!

    Yarn: Red Heart Super Saver (worsted)
    Safety Eyes: 6 mm for the eyes and 9 mm for the triangular nose
    Hook Size: 3.25 mm (D)

    HEAD/BODY
    • Complete Rows 1-6 of the instructions (36 sts).
    • Skip to Row 9. Sc around for 8 rows. (If you’re creating the panda, switch colors after completing 2 rows of sc around.) When finished, skip to Row 23 of the instructions and finish the rest as written.
    SCARF (I shortened the # of chains and used sc only, no hdc.)
    • Chain 51 instead of 62. Try this length out by wrapping it loosely around the bear.
    • Row 1: Starting in second chain from hook, sc 50 (not hdc). Fasten off.
    • Row 2: Join new color to the first stitch. Ch 1 and sc 50. Fasten off.
    • Row 3: Join original color (from Row 1) to the first stitch. Ch 1 and sc 50. Fasten off.
    • Follow rest of scarf instructions on attaching fringe, etc.
    TEDDY & PANDA EARS (I never made the koala ears, but it's probably similar.)
    • Row 1: 5 sc in magic ring.
    • Row 2: *Sc 1, 2 sc in next sc* 2 times and sc 1 in the last stitch for a total of 7 sts.
    • Row 3: Sc around (7 sts).
    • Do not make Row 4. Follow rest of ear instructions.
    TIPS & TRICKS
    To best hide all the loose ends, I made the teddy ornaments in this order:
    • Make the head/body up to Row 23 or 24 and pause (do not fasten off).
    • For the panda and koala, cut the eye patches out of felt.
    • Place the eyes (and felt pieces) on the ornament without snapping the washer on. Embroider the noise and mouth. If satisfied with the positioning of the face, snap the eye washers on.
    • Make the scarf and glue/sew it to the bear just below the mouth.
    • Make the ears and sew them on the head.
    • Attach the loop to the top of the bear's head.
    • Finally, begin stuffing the head and complete the rest of the head/body instructions. You're done!
    Since only the outside of the amigurumi is visible, I just knotted the loose ends inside the bear and didn't worry about tucking them in neatly. Some people don't like the "feel" of the knots, but it's packed full of stuffing so I can't really tell.

    Thursday, October 27, 2011

    Pac-Man Ghosts Pattern

    For Halloween, I wanted to decorate our front yard with not just regular ghosts, but Pac-Man ghosts. I adapted Erica Yen's pattern to make them slightly bigger and more proportionally similar to the original 2D sprites. If you'd like to make my version (best shown by the pink and orange ghosts), then download the pattern below!

    Availability: free (do not sell this pattern or products made from it)

    Materials:
    • Crochet hook - size G (4 mm)
    • Worsted yarn in red, orange, pink, and cyan (I used Red Heart Super Savers)
    • 2 stitch markers, polyester stuffing, and tapestry and embroidery needles
    • Black and white felt and thread for the eyes
    Click here to download the pattern in PDF format

    I also followed a great tutorial for a 10-minute giant spider web that doesn't involve any crocheting. I've seen joggers come to a complete standstill in front of it, so it must be effective. Found a fake spider at a thrift store that was added later, but didn't get a picture of it.


    Question:
    What Halloween or autumn decorations have you put up to decorate your place?

    Wednesday, October 13, 2010

    Kitten Mittens Pattern

    K absolutely loves his new company. At his previous job, he got maybe 10 emails a day, all very serious and work-related. Nowadays, his inbox has 25 emails by 10 am, usually long threads about pregnant Batman (please don't look that up) and what time is pantsless o'clock.

    Anyway, one woman always likes sending out silly cat links, and K about bust a gut when he saw that Kitten Mittons commercial from the TV show It's Always Sunny in Philadelphia. Here's how our chat conversation went:

    K: http://youtu.be/5fP4emqw7O4
    K: MAKE SOME OF THESE
    K: MAKE THEM NOW
    K: WE HAVE SLIPPERY FLOORING
    Me: lol
    Me: oh my...
    K: YOU MUST MAKE SOME
    Me: are you serious?? O_O
    K: Jolly, festive red ones
    Me: uhhhh, ok
    K: YAAAAAAAAAAAAAAAAAAAAAAY
    Me: you're funny *hug*
    K: Less hugging, more crocheting

    So a few design attemps later, I had a finished product and sent K the photographic evidence. That cat-loving coworker of K's found out and requested a set too. Here's a short clip of Chairman Meow in her new outfit:


    If you'd like to bless your kitty with such accessories, the free pattern is downloadable at Ravelry. Send me your photos and videos and I'll post them here!

    Saturday, June 19, 2010

    Tunisian Ribbed Scarf Pattern

    I wanted to make K's dad a nice wool scarf last Christmas because his job involves plowing snow-piled roads during the winter. K was very particular about the pattern because his dad will never wear anything with the slightest bit of design. I bought the plainest brown yarn in the store and somehow convinced him that a ribbed scarf would still be ordinary enough not to provoke teasing from my father-in-law's coworkers.


    After attempting to knit a few inches, I could tell that I had another painfully slow project on hand (see previous post). Instead, I turned my eyes to Tunisian crochet, which has some lovely knit- and purl-like alternatives. While the stitches unfortunately don't look the same on both sides, I still think K's dad will like it. If nothing else, it'll keep him nice and toasty.


    To download this ridiculously simple (and free) pattern, click this link from Ravelry. Enjoy!

    Saturday, August 22, 2009

    Lizard Monster Baby Booties Pattern

    Wanted to make Sara's infant son some cute bunny slippers, but K advised against the idea on account of it not being very "manly." Haha ok, I can go along with that. So I came up with these grand plans to design some crocodile booties... except crocodiles have very long snouts and shoes don't, so it ended up looking like some kind of lizard/dinosaur/monster thingy. Whatever... Ben and Sara will get a kick out of it, and it's sure to surprise a passerby here and there.


    Pattern link is here on Ravelry. A huge thanks to Patti Gonsalves and her Infant Felted Mocs, which this pattern is based on.

    Wednesday, July 8, 2009

    Metroid Zoomer Pattern


    Making the Super Mario Bros. star blanket has given me personal proof of the extreme popularity of making crafts for a niche obsession like video games. So when I decided to take my crochet skillz to the next level by designing a brand new pattern, I went to K for ideas. His request? A zoomer creature from the original Metroid video game. This proved to be a little more difficult than planned because, while the zoomer has gone through many revisions throughout the series, he wanted to model it after the iconic 2D pixelated version from his childhood.


    You can download the free pattern I designed here from Ravelry. Registration may take 2-3 days, but it's totally worth it!